
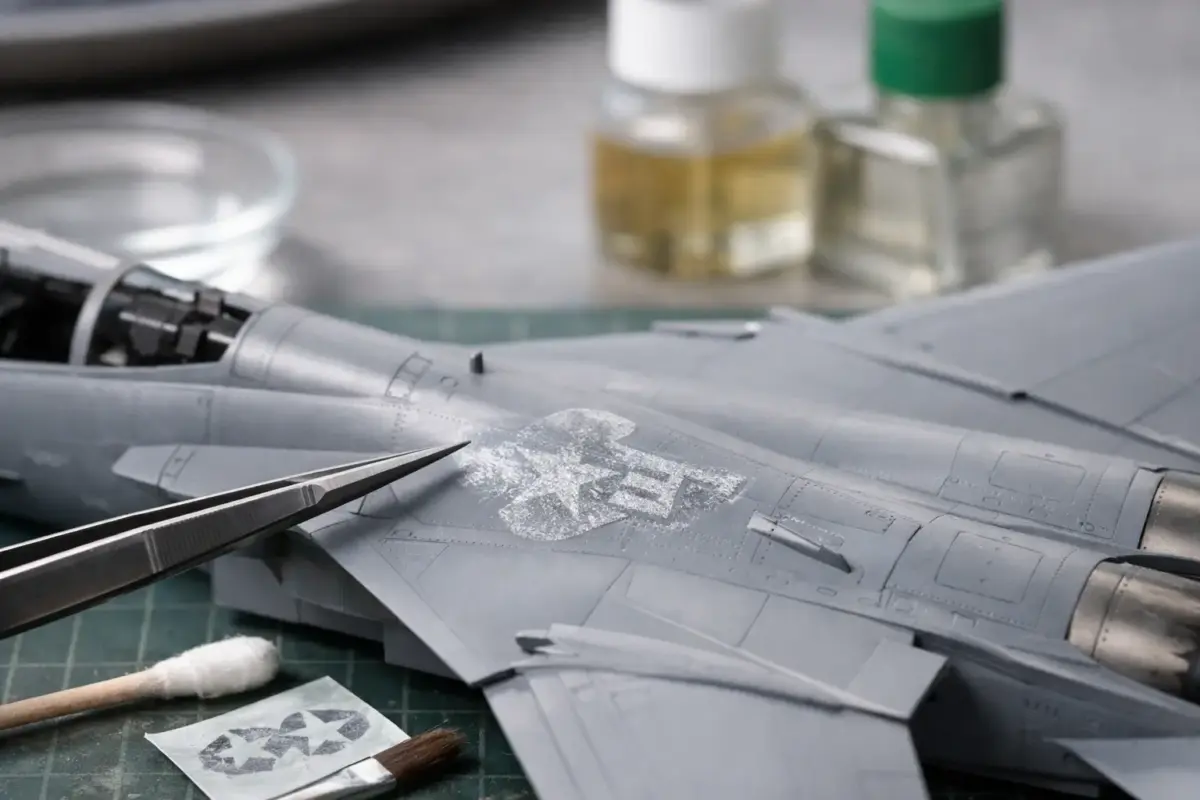
A decal can look perfectly settled while it is still wet, only to reveal a pale, frosted patch around the markings once the model dries. If you are asking why are decals silvering, the short answer is that light is catching tiny pockets of air trapped between the decal carrier film and the painted surface. The longer answer matters, because the cure depends on whether the problem is surface texture, poor adhesion, an old decal, or a finishing issue.
Silvering is one of the most common decal problems on aircraft, armour, ships and vehicles. It is also frustrating because even an excellent paint finish can lose realism when a national marking or stencil has a visible clear rectangle around it. Fortunately, it is usually preventable and, when caught early, often repairable.
Why are decals silvering on a model?
Most decals are printed on a thin clear carrier film. That film needs to sit in full contact with the model surface. When it bridges over microscopic texture, panel-line edges, paint grain or dust, tiny voids remain underneath. Those voids contain air, which reflects light differently from the surrounding paint and makes the carrier film look grey, white or silvery.
A matt-painted surface is the usual culprit. Matt and flat paints look dull because their surface is microscopically rough. That roughness is useful when painting figures or weathering a vehicle, but it gives decal film plenty of places to bridge rather than settle. A gloss surface is smoother, so it gives the decal far less opportunity to trap air.
This does not mean every decal must go on a mirror-like finish. A well-applied satin coat can work, particularly with thin, modern decals, but gloss remains the safest base for large markings and decals with generous carrier film. The important point is smoothness rather than shine alone.
Silvering is not always caused by matt paint
Even a gloss-coated model can silver. A gloss coat may look shiny from normal viewing distance while still carrying orange peel, overspray texture, brush marks or embedded dust. Decals can also struggle over raised rivets, engraved panel lines, weld seams and complex curves. On armour, the rough casting texture of a turret or the uneven finish of a heavily weathered surface can make perfect decal contact difficult.
Decal age is another factor. Older sheets can become brittle, their adhesive can weaken, and the carrier film may be thicker or less responsive to setting solutions. Some kit decals are simply more substantial than aftermarket alternatives. Thick film is not automatically poor quality, but it needs more careful surface preparation and more time to conform.
Water can play a part as well. Hard-water residue, fingerprints, polishing dust or traces of detergent may interfere with adhesion. The effect may be subtle at first, then become obvious after the decal dries or after a final clear coat is applied.
Prevent silvering before the decals go on
The best fix for silvering is avoiding it in the first place. Once paintwork is fully cured, apply a smooth gloss clear coat to the areas that will receive decals. You can gloss the entire model if you prefer a consistent working surface, or apply it locally to reduce the amount of later finishing required. Either approach is valid, provided the coat is even and properly dry.
Let the gloss coat cure rather than judging it only by whether it feels dry to the touch. A soft clear coat can mark under handling and may react poorly to decal solutions. The required time varies between lacquer, acrylic and enamel systems, so follow the guidance for the products you are using and allow extra time in a cool workroom.
Before decalling, gently remove dust with a clean, soft brush or a lint-free cloth. Avoid touching the area with bare fingers. Skin oils can be enough to affect small stencil decals, especially on a polished gloss surface.
Use decal solutions for the job they are meant to do
A decal setting solution helps the decal adhere to the surface and improves contact beneath the film. A softening solution works more aggressively, making the decal flexible enough to conform around detail. They are related but do different jobs.
Apply a small amount of setting solution to the model surface, place the decal, then carefully position it with a soft brush. Once it is in place, press out excess water and air using a damp cotton bud, folded tissue or a soft silicone tool. Roll or dab gently from the centre towards the edge rather than dragging the decal across the surface.
When a decal needs to settle over panel lines, rivets or compound curves, apply a compatible softening solution sparingly. It may wrinkle as it reacts. Leave it alone at this stage. Trying to flatten a softened decal with a brush is a reliable way to tear it, distort the printing or leave a fingerprint in the film.
Different decal manufacturers react differently to strong solutions. Test a spare marking from the sheet where possible. A mild solution may need repeated applications; a powerful one can damage thin decals if used too heavily. There is no advantage in choosing the strongest product by default.
A reliable decal application method
Good results come from a controlled sequence rather than one magic product. Cut each marking close to the printed design where practical, especially if the sheet has a large continuous carrier area. Leave enough film around the design to handle it safely, but do not carry unnecessary clear film onto the model.
Soak the decal only until it begins to release from its backing paper. Transfer it to a damp tile, palette or the model surface rather than leaving it floating in water for long periods. Slide it into position with a wet brush, using enough moisture that it can still be adjusted without forcing it.
Once aligned, wick away the water carefully. A decal that is sitting in a puddle cannot bed down properly. Apply your setting solution, then leave the marking to dry. Check it after several hours, preferably under a strong angled light. That is when faint silvering around clear film is easiest to spot.
For larger decals, such as aircraft roundels, racing stripes or ship deck markings, work one section at a time. A broad decal can trap moisture in the middle even when its edges appear secure. Patience here is preferable to trying to force the whole marking down in a single pass.
How to fix decal silvering already on the model
If the decal has dried and only small areas are silvered, the usual repair is to give trapped air a route out and then introduce solution beneath the carrier film. Use a fresh, very fine needle, pin or sharp scalpel point to make a few tiny punctures in the affected clear area. Keep the holes away from printed ink wherever possible.
Apply a small amount of setting solution over the decal and allow capillary action to draw it through the punctures. Gently press with a damp cotton bud once the solution has had a moment to work. Repeat if necessary after the decal has dried. Several light treatments are safer than flooding the area with strong softener.
If the silvering is concentrated along a carrier-film edge, carefully lifting that edge with a blade point can allow solution underneath. This is delicate work and is best reserved for a clearly accessible edge. If the decal starts to fracture, stop and allow it to dry before deciding whether replacement is the better option.
A final clear coat can reduce the appearance of very mild silvering by evening out the surface sheen, but it cannot reliably remove trapped air. Treat the cause before sealing the decals. Applying matt varnish over obvious silvering often makes the pale patches more noticeable, not less.
When replacement is the sensible option
A badly silvered decal with a large, thick carrier film may not be worth rescuing, particularly on a prominent aircraft marking or a clean display finish. If you have spare decals, an aftermarket sheet or masking options for simple insignia, replacement can produce a better result than repeated treatment.
Remove a failed decal cautiously. Re-wet it with warm water or decal solution, lift it a little at a time, and avoid scraping aggressively at the paint. You may need to polish and re-gloss the area before applying the replacement. This is slower than a quick repair, but it is often the cleanest route on a competition-standard build.
Seal decals at the right point in the finishing process
Once decals are fully dry, inspect them again under good light. If they have conformed correctly and show no silvering, seal them with a clear coat compatible with your paint system. This protects the markings from washes, filters, handling and later weathering stages.
For a weathered military model, a clear coat also helps blend the decals into the painted finish before you add fading, grime and dust. For a clean civil aircraft or racing subject, choose the final sheen that matches the real subject. The goal is not always dead matt. Aircraft, vehicles and ships all show different levels of sheen depending on their paint, service use and scale effect.
Decal work rewards preparation more than speed. Keep the surface smooth, use clean water and controlled amounts of solution, and inspect each marking before moving on. If a particular decal sheet is fighting you, a small test on a spare painted part can save a finished model from an avoidable silvered marking.
