
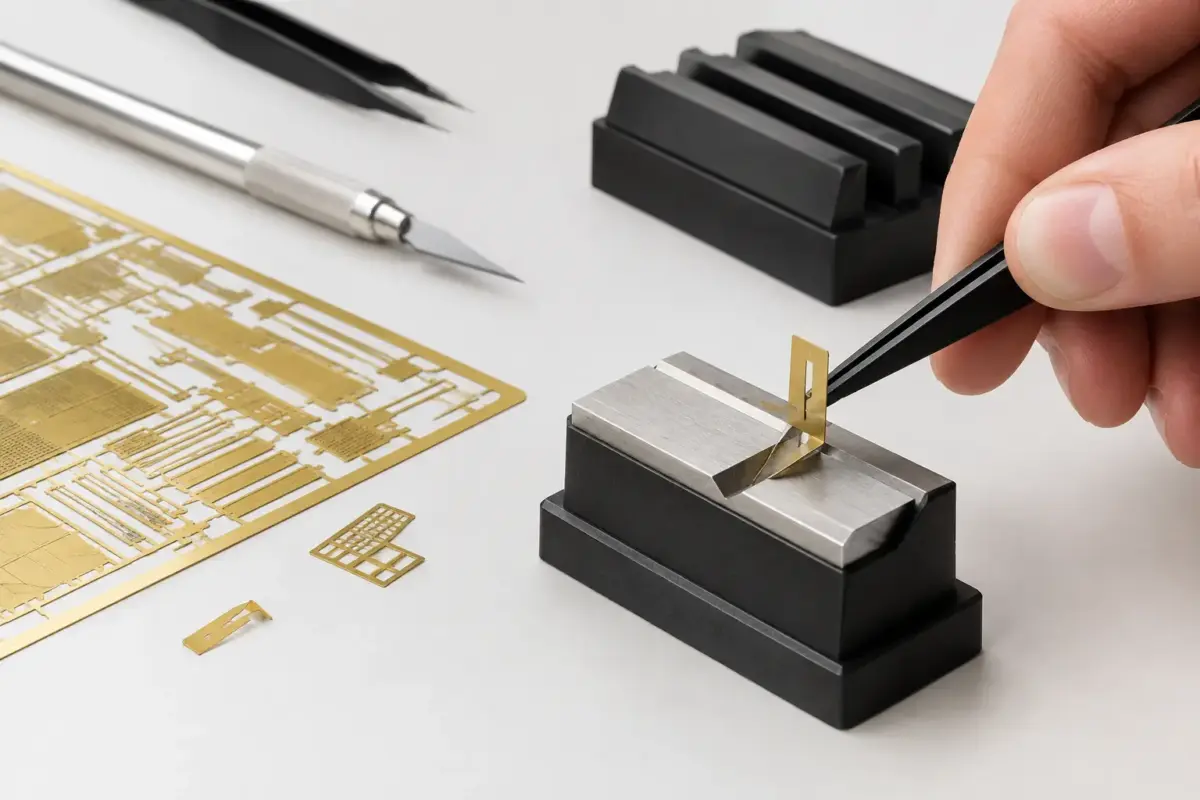
A finely detailed cockpit harness, radar array or ship rail can transform a kit, but only if the folds are crisp and sit at the correct angle. Photo etch bending tools make that precision repeatable. They hold the part firmly along a straight line, so you can form brackets, boxes and hinges without marking the brass or chasing a bend that has gone slightly off-square.
For many modellers, photo-etched parts feel like the point where a straightforward build becomes a precision job. That is partly true, but the right preparation and a sensible tool choice remove much of the frustration. The aim is not to buy the largest bending tool available. It is to match the tool, blade and technique to the size and style of parts in your chosen subjects.
What photo etch bending tools actually do
A dedicated bending tool, often called a photo-etch folding tool or hold-and-fold tool, consists of a flat base and a clamping plate. The plate has straight edges, fingers or shaped sections that trap a brass or nickel-silver part while leaving the section to be folded exposed. A thin folding blade is then used to lift the exposed metal through the required angle.
This matters because photo-etch is thin, springy and easily distorted. Flat-nosed pliers can manage a simple, narrow fold, but they only grip a short area and can leave a bend uneven from one end to the other. A bending tool supports the entire fold line. It is especially useful for long aircraft access panels, armour stowage bins, ship platforms, locomotive handrail supports and folded ammunition boxes.
Not every etched part needs one. Seat belts, small latches and individual handles can often be shaped with tweezers, smooth-jawed pliers or a rounded burnishing tool. The dedicated tool earns its place when accuracy across a straight fold is visible on the finished model.
Choosing the right size of bending tool
The best size depends less on your experience level than on the subjects and scales you build. A compact tool is excellent for 1/72 aircraft cockpits, 1/48 aircraft details, 1/35 vehicle fittings and most figure accessories. Its shorter clamping fingers are easier to position around small, awkward shapes, and it takes up little space on the bench.
A medium or large tool becomes more useful for 1/35 armour, 1/24 vehicles, 1/32 aircraft and ship models with long railings, deck structures or platform edges. It gives you a longer uninterrupted clamping edge, which helps prevent a long fold from developing a slight curve. It can still fold small parts, although positioning tiny pieces under a broad plate may feel less controlled.
If you mainly build ships, check the length of the longest likely fold rather than choosing by scale alone. A 1/700 ship can include surprisingly long etched deck edges and splinter shields. Conversely, a 1/35 armour modeller may only need a compact tool if their etched upgrades are limited to brackets, tool clamps and storage boxes.
Look closely at the clamping plate design as well. Straight edges suit long folds. Narrow fingers are useful where a fold line ends close to another raised detail, while curved or angled sections can help form more complex parts. A tool with varied finger widths is generally the most flexible choice for a mixed modelling bench.
Folding blades and useful supporting tools
The supplied folding blade is not an afterthought. A thin, stiff blade can get beneath a narrow flap without pushing the part out of position. Wider blades are better for lifting a longer fold evenly. Some modellers favour a single-edge razor blade for very fine work, but it must be handled with appropriate care and stored safely.
A few supporting tools make the process much more predictable: a fine self-closing tweezer for placing parts, a sharp sprue cutter or photo-etch shear for removing them from the fret, a fine file or sanding stick for cleaning attachment points, and magnification where needed. Smooth-jawed pliers remain useful for tiny tabs and for gently correcting an angle after removal from the bender.
Avoid using a hobby knife blade as a lever if it is already worn or flexible. It can skid along the brass, leave a score line or suddenly spring free. A purpose-made folding blade gives better control and is kinder to both the part and your fingers.
Preparing etched parts before the fold
Most problems begin before the part reaches the bending tool. Remove it from the fret on a hard, flat surface, cutting as close as possible to the attachment points without twisting the part. A twisting action can put a permanent curve into fine railings or long strips before any deliberate shaping starts.
Clean the remaining tags with a fine file, sanding stick or diamond file. This is particularly important where the attachment point sits on the eventual fold line. Even a tiny burr can stop the part sitting flat in the clamp and cause the bend to wander.
Study the instructions and dry-position the part before folding. Establish which face will be visible and whether the etched relief should sit inside or outside the bend. It is surprisingly easy to create a flawless fold on the wrong side. For boxes and brackets, mark the sequence mentally first: folds that will later be obstructed should normally be made before adjoining walls are raised.
Some complex brass components benefit from annealing, where gentle heat softens the metal and reduces spring-back. This can be useful for curved aircraft cowling sections or rolled ship fittings, but it is not a default step. Many modern etched sets are designed to fold cleanly as supplied, and overheating can discolour the metal or make fine parts too soft to handle. Follow the detail-set manufacturer’s guidance where it is available.
A reliable method for sharp, square folds
Place the part on the base of the tool with the fold line aligned exactly to the clamping edge. Tighten the clamp enough to stop movement, but do not overtighten it. Excess pressure can imprint delicate surface detail or bow an extremely thin part.
Slide the folding blade under the exposed section and raise it gradually. For a short tab, a single controlled movement usually works. For a long edge, start near the centre and work outward in small sections, keeping the blade level. This spreads the force and reduces the chance of a bowed fold.
Stop at roughly 90 degrees, check the alignment, then make any final adjustment with pliers or the flat of the blade. Trying to force a fold sharply past its final position and then bending it back weakens the metal. Brass tolerates some adjustment, but repeated working can cause fatigue and break a narrow tab.
For a U-shaped box, fold the opposing sides a little at a time rather than fully raising one side before starting the other. This keeps the component square. Where two faces need to meet precisely, test-fit them against a small engineer’s square, a metal rule or even the edge of a clean acrylic block before applying adhesive.
Common photo-etch problems and how to avoid them
A fold that looks rippled usually means the part was not clamped evenly, or the blade lifted one end before the other. Re-flattening may be possible between two hard, smooth surfaces, but only attempt it gently. If the part contains raised rivets or relief detail, aggressive flattening can do more harm than the original bend.
If a fold springs back, the metal may need a slightly firmer final movement. Bend just beyond the required angle, but only by a small amount. The correct allowance varies between brass, stainless steel and nickel-silver, and between manufacturers, so a spare fret tab is useful for testing.
Parts that disappear are a familiar bench hazard. Work over a light-coloured tray or shallow lid so a dropped item has somewhere contained to land. Good lighting and magnification also matter more than speed. Photo-etch rewards deliberate handling, particularly once parts become smaller than a fingernail.
Adhesive choice affects the result too. Thin cyanoacrylate is suitable for many joints but can wick across nearby detail. A gel formula gives more positioning time, while a specialist metal adhesive may be preferable for larger assemblies. Apply the smallest practical amount with a fine wire, pin or applicator rather than directly from the nozzle.
When a bending tool is worth adding to the bench
If you occasionally fit a simple etched grille, your existing tweezers and pliers may be enough. If you regularly add detail sets to aircraft, armour, ships or railway subjects, a photo-etch bending tool soon saves time, wasted parts and avoidable compromises. It is also one of those tools that improves the finish of a model without demanding a difficult new technique.
At Scale Model Shop, the most useful approach is to choose your bending tool alongside the detail set and supporting tools for the project, rather than treating it as an isolated purchase. Consider the largest fold you expect to make, the smallest parts you are comfortable handling, and whether a varied-finger clamp will suit the subjects you build most often.
Start with a few simple brackets from a spare fret before committing to the most prominent part in the set. Once the movement of clamping, lifting and checking becomes familiar, even intricate etched assemblies become a satisfying part of the build rather than a reason to leave the brass in the packet.
