Paint choice can make a well-built kit look convincing or slightly off, and most modellers learn that the hard way. The plastic may be clean, the seams may be sorted, and the detail may be sharp, but if the finish is too thick, the sheen is wrong, or the tones fight each other, the whole build suffers. This scale model paint guide is designed to help you choose the right paint system for the subject, the finish and the way you prefer to work.
For some builders, that means fast, reliable acrylics through an airbrush. For others, it means careful brush painting, enamel washes and a clear plan for primers, varnishes and weathering. There is no single best paint for every kit. The right answer depends on scale, subject, working environment, drying time, odour tolerance and the result you want on the bench.
How to use this scale model paint guide
Start with the model, not the paint rack. A 1/72 RAF fighter, a 1/35 late-war tank and a set of fantasy miniatures all ask for slightly different things. Aircraft often punish poor surface preparation because large smooth areas show every flaw. Armour can be more forgiving, but it also relies heavily on tonal variation, dust, chipping and matt control. Figures need clean coverage and careful colour placement. Ships and railway structures often benefit from subtle weathering and disciplined finish control rather than heavy contrast.
The next question is how you paint. If you mainly brush paint, coverage, self-levelling and working time matter more than ultra-fine atomisation. If you airbrush regularly, thinner compatibility, drying behaviour and tip-dry become part of the decision. Most experienced modellers end up using more than one paint type across a build because each stage has different demands.
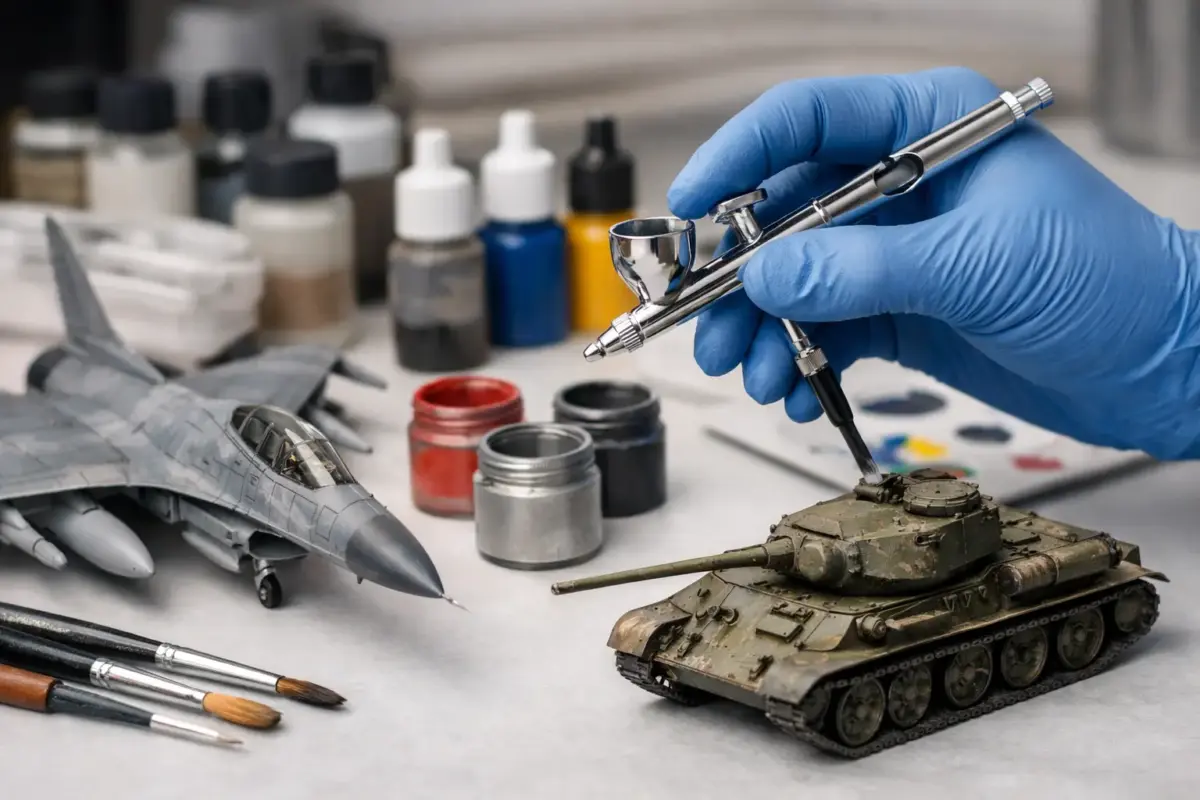
Acrylic, enamel or lacquer
Acrylics are the usual starting point for many hobbyists because they dry quickly, are widely available across military, aircraft and figure ranges, and are generally easier to use indoors. They are especially practical for base coating, modulation and general airbrushing. The trade-off is that not all acrylics behave the same way. Some are ideal for brush painting, while others perform best through an airbrush and can be frustrating with a hand brush unless handled carefully.
Enamels still have a firm place on the workbench. They brush well, often level nicely, and remain popular for washes, filters and certain detail work. Their longer drying time can be useful when you want more working time, but less useful if you want to move quickly through a project. Odour and cleanup are also considerations, particularly in smaller indoor workspaces.
Lacquer-based paints are often chosen by modellers who want a very durable, fine finish with strong adhesion and smooth spraying characteristics. They are excellent for airbrushing, especially on aircraft and automotive subjects where surface quality matters. The compromise is that they require more care with ventilation, thinners and handling. They are not the best fit for every modeller, even if the finish can be superb.
Primer first, especially on modern kits
Primer is not just there to change the plastic to a neutral colour. It helps paint grip, reveals sanding flaws and gives you a consistent surface before the main colours go on. On multi-material builds with resin, photo-etch or 3D printed parts, primer becomes even more useful because different materials can otherwise take paint differently.
Choose primer with the finish in mind. Grey is the usual all-round option. Black can help with shadow and depth, particularly for armour and darker aircraft schemes. White or very light primers help bright colours cover more cleanly, which matters on racing subjects, civilian builds and some figure work. A primer coat also tells you very quickly whether panel lines are clogged, seams are still visible, or the surface needs another pass before colour.
Brush painting without brush marks
Good brush painting is less about the brush alone and more about paint consistency and patience. Paint that is too thick leaves texture, obscures detail and dries awkwardly at the edges. Paint that is too thin can streak and force too many coats. The target is controlled coverage built up in light applications.
Use a decent quality brush matched to the job. A larger flat brush is often better for broad areas than trying to force a small pointed brush to do everything. Let each coat cure properly before the next one goes down. Trying to correct semi-dry paint usually makes the finish worse. For cockpit details, figures and small fittings, a fine pointed brush still matters, but it should be carrying paint that flows, not paint that drags.
Some colours are naturally more difficult than others. White, yellow and red often need more planning than grey, green or black. A suitable undercoat can save time and improve the final tone. This is especially true in smaller scales where excessive paint thickness quickly softens detail.
Airbrushing for smoother scale finishes
Airbrushing gives better control over thin, even coats, soft camouflage edges and subtle tonal variation, but it only pays off if the paint is prepared properly. Many spraying problems blamed on the airbrush are actually thinning or pressure problems. If the paint is too thick, you get spatter and poor flow. Too thin, and coverage becomes weak or the finish pools.
There is no universal ratio because different brands and ranges vary widely. Matt paints, metallics and primers all behave differently. It is better to test on a spoon or spare part than assume one mix works for everything. Keep passes light and build opacity gradually. Flooding a surface to get instant coverage usually ends with runs, grain or lost detail.
For camouflage, think about edge type before you start. Hard-edged patterns may suit masking. Soft Luftwaffe mottling or post-shading on armour needs a different setup and more trigger discipline. Not every scheme needs modulation and pre-shading either. Sometimes a clean, accurate coat with subtle weathering looks more convincing than forcing every technique onto the same model.
Choosing the right finish for the subject
Finish is where realism often lives. The right green on a tank can still look wrong if the varnish leaves it too glossy. Equally, aircraft do not all want a dead-flat finish. Operational wear, climate, scale effect and the real material all influence sheen.
Armour usually benefits from matt to satin control, with variation introduced by oils, washes, mud and dust effects. Aircraft often need more selective treatment. Decal areas may need a gloss coat first, while the final finish might settle somewhere between matt and satin depending on era and operator. Naval subjects can vary from weathered and flat to cleaner semi-sheen surfaces. Figures often look best with different finishes on different materials, such as matt cloth, satin leather and carefully handled metallics.
Metallics need even more thought. A highly polished natural metal aircraft needs a very smooth base and careful handling. Dry-brushed steel on tools or tracks is a different job entirely. One reason paint ranges are so broad is that the same word, like metallic or matt, covers very different real-world effects.
Paint compatibility and workflow
One of the most common frustrations in the hobby is not poor technique. It is incompatible layers. A primer, base coat, wash and varnish can all behave well on their own and still react badly together if the sequence is rushed or the chemistry clashes. Giving each layer proper curing time matters as much as the product itself.
A practical workflow often looks like this: prime, apply base colours, gloss where decals or enamel washes require it, seal if needed, weather in stages, then finish with the final varnish. That order changes depending on the build, but the principle stays the same. Build in controlled layers and avoid stacking wet products on surfaces that are not fully cured.
If you like using enamel or oil weathering over acrylic paint, a clear coat can add a margin of safety. If you prefer lacquer primers under acrylic colour coats, that can be a very stable combination. What matters is testing combinations and not assuming every paint line plays nicely with every thinner, varnish or effect product.
What beginners should buy first
A beginner does not need every shade in a range. A sound starter setup is far more useful than a huge paint collection full of colours that do not suit the next project. Focus on a dependable primer, the main subject colours, a thinner if required, a clear gloss or satin for decals, a matt varnish, and a small set of detail colours such as black, white, metallic and leather tones.
The best range for you depends on whether you want to brush paint, airbrush, or do both. That is where specialist retailers make a difference. Scale Model Shop, for example, carries broad paint and finishing ranges from established brands, which makes it easier to build a compatible workflow instead of piecing products together from multiple places and hoping they behave.
For more experienced modellers, expanding into filters, pigment binders, chipping colours, modulation sets and specialist metallics makes sense once the core process is stable. Extra products help most when they solve a specific finishing problem, not when they simply add complexity.
Common paint problems and what they usually mean
If paint beads on the surface, the model may need better cleaning or a more suitable primer. If the finish feels grainy, the paint may be drying before it lands, especially through an airbrush. If brush marks stay visible, the paint is often too thick or being overworked. If masking lifts the paint, adhesion or curing time is usually the issue rather than the tape alone.
Most painting problems are recoverable. Sand back the rough area, re-prime if needed, and repaint in thinner, more controlled coats. A model rarely goes wrong in one dramatic moment. It usually goes wrong in a series of rushed steps. Slow the sequence down, and the result nearly always improves.
The best paint setup is the one that fits your bench, your subject and your preferred way of building. Start simple, keep the layers compatible, and let each product do the job it is actually good at. A better finish usually comes from better decisions, not more paint.