Fresh paint straight from the bench can look tidy, but it rarely looks convincing. A good scale model weathering guide is really about restraint – adding enough wear, dust, grime and fading to suggest use, age and environment without burying the detail you worked hard to build.
Weathering is where many models either come to life or go slightly too far. The trick is not to treat every kit the same. A front-line tank, a carrier-based aircraft, a steam-era wagon and a sci-fi mech all wear differently. Scale matters as well. Heavy rust on a 1/72 vehicle can look oversized, while subtle streaking that works beautifully on 1/35 armour may disappear entirely on a smaller subject.
What weathering is supposed to do
At its best, weathering supports the story of the model. It helps the viewer understand where the subject has been, what conditions it has seen and how it has been maintained. An RAF fighter might show exhaust staining, chipped wing roots and a little oil around panels. A late-war tank might carry dried mud in the running gear, fuel spills near the caps and polished metal on exposed edges. A ship will weather in an entirely different pattern again, with streaking, salt effects and vertical rust marks shaped by gravity and exposure.
That is why reference matters more than fashion. It is easy to copy dramatic effects from social media, but realism usually comes from observing the real thing. Even if you prefer a slightly stylised finish, reference gives you a sensible starting point. From there, you can decide whether you want museum-clean, operationally used or heavily worn.
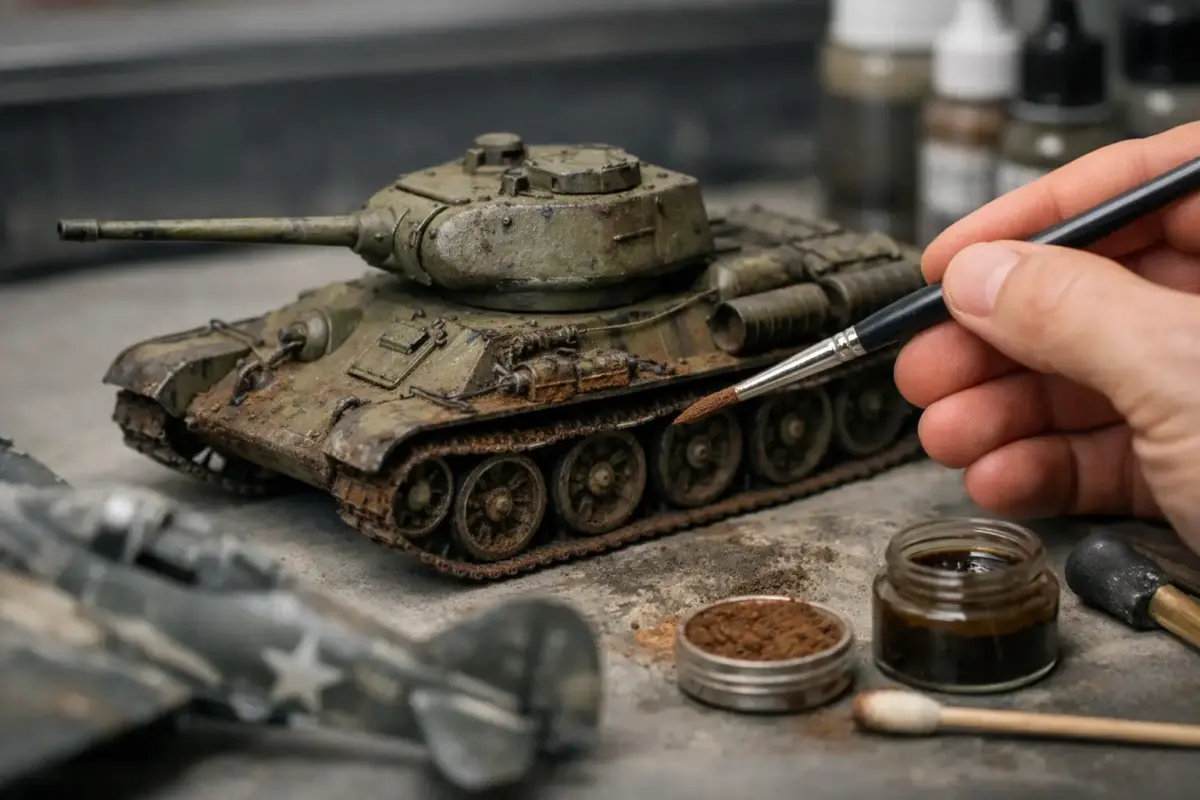
A scale model weathering guide starts with the surface
Weathering behaves differently depending on what sits underneath it. If the base paint is rough, chalky or not fully cured, washes can stain unpredictably and chipping may tear at the finish instead of sitting neatly on top. A smooth, well-prepared painted surface gives you control.
For most subjects, primer first is the sensible route. It improves adhesion and helps reveal small flaws before you commit to camouflage or final colours. Once the base coats are on, a clear coat often makes the next stage easier. Gloss finishes tend to suit decals and panel line washes because they reduce drag and tidemarks. Matt and satin surfaces can work too, but they grab pigments and enamel effects more aggressively, which can be useful or frustrating depending on the result you want.
There is no single correct sequence for every modeller. Acrylic, lacquer and enamel systems can all produce excellent weathered finishes, but compatibility matters. If you are layering products from different brands, always test first. That is particularly relevant when using specialist weathering products, panel line washes and thinners over painted and decalled surfaces.
The core weathering stages
Most weathering builds up in layers rather than one dramatic session. Panel line washes are often the first visible step after decals and sealing coats. Their job is to add definition around recessed detail, fasteners and structural lines. On aircraft and ships, this can sharpen surface detail. On armour, a pin wash around bolts, weld seams and raised features usually looks more natural than flooding the whole model.
Filters are subtler. They are thin applications of colour used to shift the tone of the paintwork rather than create strong contrast. A dusty filter can unify camouflage on a vehicle. A blue-grey filter can cool naval surfaces. They are easy to overdo, so the safest approach is to build slowly and let each pass dry before deciding whether it needs more.
Chipping comes next for many subjects, but not all subjects need much of it. Aircraft often wear in specific access areas, leading edges and wing roots. Armour sees abrasion around hatches, tool clamps and crew traffic zones. Figures and fantasy subjects can take stronger contrast if that fits the style. Fine sponge chipping can give a random effect, while a brush gives more control. Use both if needed, but keep chip size appropriate to scale.
Streaking and grime add direction and age. Vertical streaks from rain, fuel spills, oil leaks and accumulated dirt work especially well on armour, ships and rolling stock. The key is to place them where fluids would actually collect or run. Random streaks across flat surfaces tend to look forced. Less is usually better, particularly on smaller scales.
Pigments and textured effects are ideal for dust, dried mud, earth and soot. They can add realism to tracks, tyres, lower hulls and groundwork, but they need context. Bright orange rust powder on a vehicle that otherwise looks clean can feel disconnected. Tie the tones together so dust on the running gear relates to the terrain, and exhaust soot relates to the engine area and airflow.
Adjusting the effect by subject and scale
A practical scale model weathering guide should never pretend that a 1/144 jet and a 1/16 tank are weathered the same way. The smaller the scale, the more compressed the effect needs to be. Contrast still matters, but texture and chip size must be reduced. What looks subtle under magnification can look theatrical at normal viewing distance.
Aircraft generally benefit from controlled weathering. Exhaust stains, fluid leaks, faded panels and restrained chipping are usually enough. Modern jets can be patchy and stained, but often in a very specific maintenance-driven way. WWII aircraft vary enormously by theatre, service conditions and paint quality.
Armour gives you more room for layered work. Dust, mud, chipping, rust tones, fuel marks and rubbed metal can all sit together if they are applied with a clear logic. Running gear and lower hulls are the natural focus. Upper surfaces usually need more restraint unless the vehicle has genuinely been abandoned or heavily exposed.
Ships are less forgiving than they look. Large flat areas can tempt heavy treatment, but realistic naval weathering relies on pattern and placement. Rust forms around fittings, drains, anchor gear and damaged coatings. Salt streaking and sun fade can be stronger than on smaller land subjects, though still best built gradually.
Figures and wargaming miniatures sit in a slightly different category. Here, weathering often supports readability as much as realism. Dusty hems, worn leather, battle damage and mud splashes can help define character. If the figure belongs in a diorama or on a gaming base, match the weathering to the ground it stands on.
Choosing products without making the process harder
There is no shortage of weathering products now, and that is useful provided you buy for the task rather than the label. Washes, streaking effects, pigments, chipping fluids, textured pastes and specialist rust sets can all save time, but too many overlapping products can complicate the finish.
For most modellers, a reliable setup starts with a primer, base paints, a clear gloss or satin, a dark wash, a few oil or enamel weathering tones, and pigments for earth and soot. From there, expand according to subject. Armour builders may want mud textures and fuel stains. Aircraft modellers often lean towards panel line products, exhaust tones and fading colours. Figure painters may focus more on dust, fabric wear and environmental effects.
Trusted hobby brands matter because consistency matters. If you are trying to achieve a repeatable finish across multiple builds, dependable paints, weathering media and thinners save a lot of frustration. That is especially useful when sourcing everything for one project in one order, from the kit itself through to varnishes, brushes and specialist finishing products.
Common mistakes and how to avoid them
The most common issue is applying every effect at full strength. Real subjects weather unevenly. One area may be dusty, another faded, another freshly repainted. If everything is chipped, streaked, rusted and muddy, the eye has nowhere to rest.
The second is ignoring scale. Oversized chips, thick panel lines and coarse pigment texture will make a small model look toy-like. If in doubt, reduce the contrast by half and assess it the next day.
The third is poor sequencing. Applying enamel effects over an unprotected base coat, or adding pigments before all fluid effects are done, can create unnecessary rework. Let products cure properly and build in a logical order. It is slower, but usually cleaner.
Finally, do not chase someone else’s finish on a subject that needs something different. A desert-streaked tank style may not suit a Fleet Air Arm aircraft, and a heavily rusted abandoned look may not make sense on a well-maintained locomotive. Weathering should fit the story of the model, not just the technique you want to try.
When to stop
Knowing when to stop is harder than learning any single method. Step back from the bench, look at the model under normal room lighting and ask whether the wear supports the subject or competes with it. Photographs help because they reveal contrast and repetition quickly.
If you are unsure, seal what you have and leave it for a day. Many strong effects soften as they dry, and a final matt or satin coat can unify everything. You can always add another pass of dust, grime or fading later. Removing excess weathering is often much harder.
The best results usually come from patience, not from using the most products. Build the finish in layers, keep your references nearby, and let each model tell you how far it wants to go.