
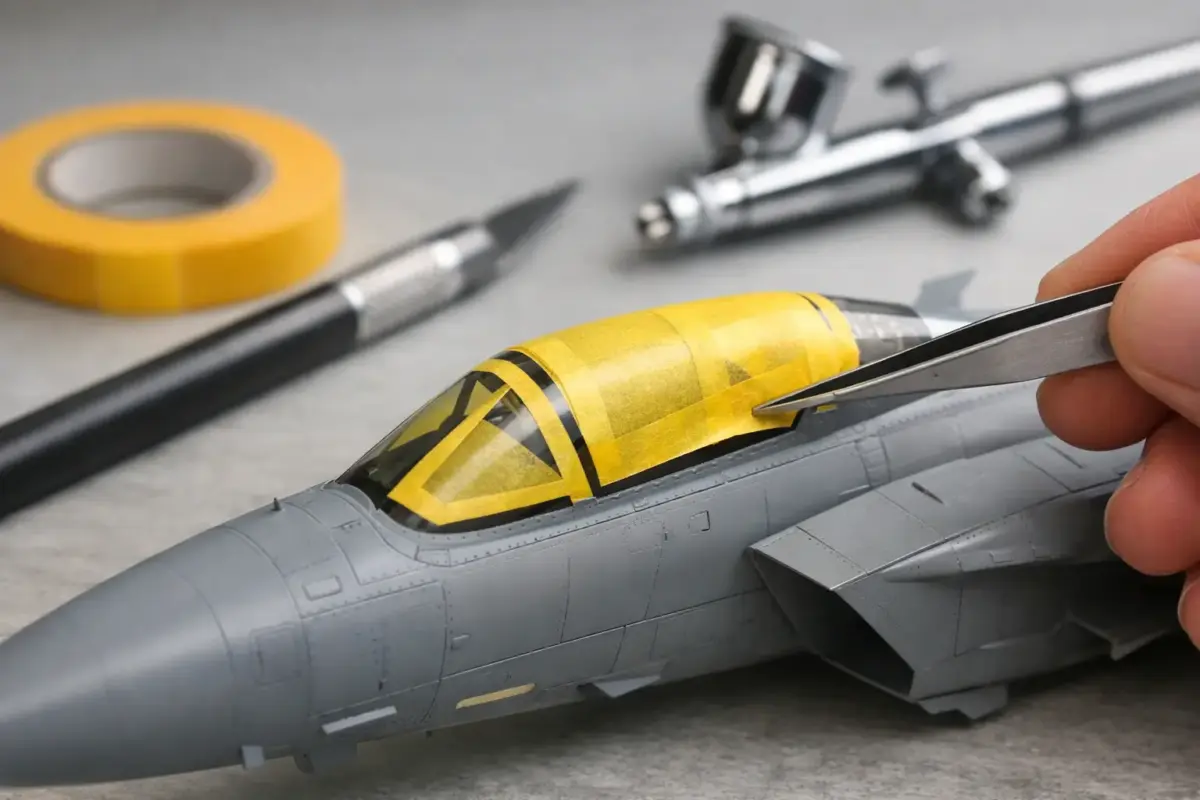
A neatly painted canopy can make an otherwise straightforward aircraft build look far more convincing, while a soft edge or a smear of paint on the glazing draws the eye immediately. Learning how to mask model canopies is therefore one of the most worthwhile finishing skills for aircraft modellers. The aim is simple: keep the transparent panes clear, reproduce the frame layout accurately and remove the mask without lifting paint or damaging the part.
The right method depends on the canopy itself. A large, flat-framed WWII fighter canopy can often be masked quickly with tape, while a modern jet with many small, curved panes may justify a dedicated pre-cut mask. What matters most is preparation, careful burnishing and restraint with the paint.
Prepare the clear parts before masking
Start with a clean canopy. Mould-release residue, sanding dust and fingerprints can stop tape adhering properly, creating the tiny gaps that allow paint to creep underneath. Wash the clear sprue or separated parts in lukewarm water with a small amount of mild washing-up liquid, then let them air dry fully. Handle the glazing by the edges afterwards.
Check the part under a strong lamp before applying any mask. If there is a mould seam running across the canopy, remove it now with progressively finer sanding or polishing materials, then restore clarity with a suitable plastic polish. A canopy that looks clear before paint is applied will remain far easier to inspect once the masks are in place.
Many modellers also dip clear parts in a dedicated acrylic clear coating. This can improve the appearance of slightly soft kit glazing and offers a little protection during handling. It is optional, not compulsory. If you do use one, allow it to cure completely before masking and test your chosen tape on spare clear plastic first.
Choose the right canopy masking method
For most aircraft kits, low-tack masking tape is the dependable starting point. Quality modelling tape has a controlled adhesive and a thin edge, allowing it to follow frame lines without leaving an obvious ridge. Cut it into narrow strips rather than trying to force one large piece over compound curves. Narrow tape conforms better and is less likely to lift at the corners.
Pre-cut canopy masks are a practical alternative when they are available for the exact kit and scale. They save time on complex glazing, particularly greenhouse canopies, bombers and modern aircraft with intricate windscreen framing. They are not automatically perfect, though. Check each piece against the raised or engraved frame before pressing it down, as kit tolerances and mask placement can vary slightly.
Liquid masking fluid works best for irregular panes, very small windows or areas where tape would need several awkward cuts. Apply it carefully inside the frame boundary with an old fine brush or cocktail stick. It must dry fully, and it should be removed reasonably soon after painting. Leaving some masking fluids on clear parts for long periods can make removal difficult.
For a typical build, keep four useful items at the bench:
- low-tack masking tape in more than one width;
- a fresh scalpel blade and cutting mat;
- fine tweezers or a pointed wooden stick;
- a magnifier or close-up visor for checking every frame edge.
How to mask model canopies with tape
If the kit has raised canopy frames, use them as guides rather than attempting to cut every panel as a separate shape. Place a small piece of tape over one pane, press it down gently, then use a new blade to trace the frame line with very light pressure. You are cutting the tape, not scoring the transparent plastic underneath.
Lift away the section covering the window with tweezers, leaving tape on the frame. Work one pane at a time. This is slower than covering the entire canopy in tape and cutting all the lines in one go, but it gives much better control and makes mistakes easier to correct.
On canopies with engraved frames, apply narrow strips of tape directly over the frame lines. Fill the larger central areas with additional tape or liquid mask. This approach avoids cutting against the clear part and is usually the safer option when frame edges are not prominent enough to guide a blade.
Burnish every tape edge gently. A cotton bud, wooden cocktail stick or silicone-tipped shaper is ideal. Press along the frame line, especially where tape overlaps or bends around a corner. Do not use enough force to distort a thin canopy or push it out of alignment if it is already attached to the fuselage.
For open canopies, consider whether to paint and mask the parts separately. This often makes access easier and keeps the cockpit visible while you work. The trade-off is that loose parts are easier to lose or damage. Attach them temporarily to a handle with a small amount of tacky putty, or leave a discreet section of sprue attached until painting is complete.
Mask the inside if it will be visible
A closed canopy usually only needs exterior masking, but an open canopy can reveal the inside of the frames. On many aircraft, the internal frame colour should match the cockpit colour, not the exterior camouflage. Mask the outside first, spray the interior frame colour, then continue with the exterior colours.
This sequence also works well for closed canopies. Spray the cockpit or interior shade over the exterior masks first, followed by the aircraft’s exterior colour. When the masks are removed, the visible edge of each frame has the correct internal colour from inside the cockpit, giving a more realistic result without separately masking both surfaces.
Stop paint bleeding under the masks
Paint bleed is usually caused by a poor tape edge, excessive paint volume or spraying too directly into the join. The cure is not to apply a heavier coat. Build colour in several light passes instead, allowing a short flash-off time between coats.
Before applying the main frame colour, spray a very light coat of clear varnish or the underlying canopy colour over the mask edges. Any tiny amount that enters a gap will be clear or match the surface below, effectively sealing the edge. Once dry, follow with the frame colour in thin coats. This small extra step is especially valuable with heavily thinned airbrush paint.
Keep the airbrush moving and avoid directing the spray into the edge of the tape. A lower pressure and a slightly greater distance can help on delicate glazing, although the correct setting depends on the paint system, thinner and nozzle size. Aerosol paint needs particular restraint because it delivers more material quickly. Use brief passes rather than trying to cover the frames in one hit.
If you brush-paint canopy frames, use a paint consistency that flows without flooding. Pull the brush away from the tape edge where possible, and avoid repeatedly working the same spot. Several controlled coats are far safer than one wet coat.
Remove masks at the right time
Remove tape after the paint has dried to the touch but before it has fully hardened into a thick ridge. For most acrylic paints, this is often within a few hours, though always follow the paint manufacturer’s guidance. If the coating has fully cured, score gently along the tape line with a fresh blade before lifting it to reduce the chance of paint tearing.
Peel the tape back slowly at a low angle, pulling it across itself rather than straight upwards. Tweezers give control, but avoid squeezing hard enough to mark the clear plastic. Liquid mask should be rolled away gently with a fingertip, wooden stick or soft eraser rather than scratched off.
Small errors do happen. A tiny paint bleed can often be removed with a sharpened wooden cocktail stick, used carefully once the paint has cured. For more stubborn marks, a lightly dampened cotton bud with a suitable cleaner may work, but test it first. Strong solvents can craze clear plastic or strip the protective clear coat.
Final checks before the finish goes on
Once the masks are off, inspect the canopy from several angles under good light. Look for missed frame corners, paint ridges and fingerprints. Minor gaps in the frame colour can be touched in with a fine brush, while a light clear coat can help blend the finish with the surrounding airframe if appropriate for the subject.
Take your time with the first canopy on any new kit. The frame layout, plastic thickness and fit around the fuselage will tell you whether tape, liquid mask or a pre-cut set is the sensible choice for the rest of the build. If you need help selecting compatible tapes, masking products or paint colours for a particular project, the team at Scale Model Shop can help you build a practical finishing set-up.
A canopy is a small part of the kit, but it sits at the centre of the aircraft and rewards patient work. Clean preparation, a firmly sealed mask and light paint coats will do more for crisp framing than any last-minute correction.
