A convincing military diorama usually falls apart in one place first – the ground. You can finish a tank beautifully, weather it with restraint, add crisp stowage and still lose the effect if the terrain looks flat, overscale or disconnected from the subject. Choosing the right diorama materials for military models is what turns a vehicle on a base into a scene with weight, context and realism.
For most armour and military figure builders, the challenge is not finding materials in general. It is finding the right combination for the scale, theatre, season and finish you want. Mud for an Eastern Front vehicle, dry earth for North Africa, shattered masonry for an urban street, churned track marks for a recovery scene – each calls for a slightly different mix of textures and products. The best results usually come from layering materials rather than relying on one all-purpose solution.
Choosing diorama materials for military models by scene type
Before buying anything, decide what the scene needs to communicate. A quiet roadside halt needs very different groundwork from an active battlefield. If you start with the story of the scene, the material choices become far easier.
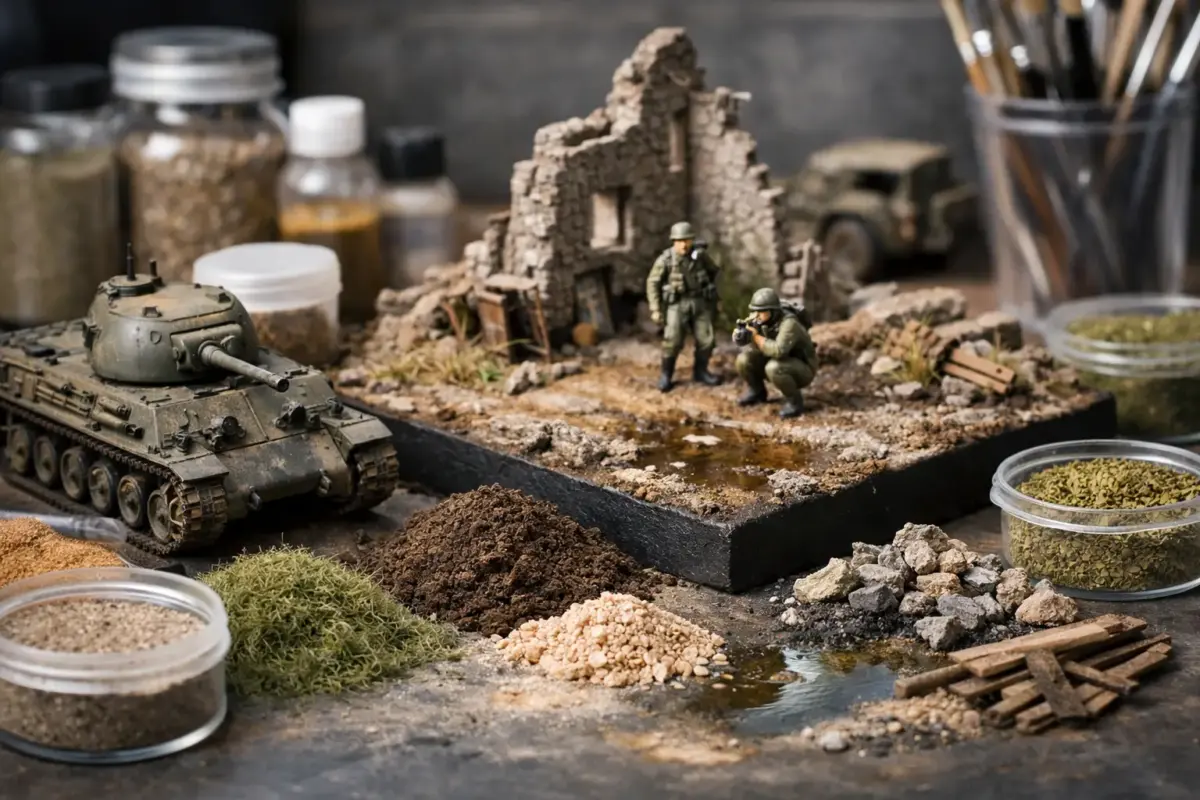
For rural settings, your core materials are usually groundwork paste, static grass, tufts, pigment, stones and foliage. For urban or ruined settings, you are more likely to need plaster, brick debris, sheet materials, rubble, wire and dust effects. Snow and wet terrain add another layer, often requiring dedicated snow products, gloss wet effects or water-texture materials.
Scale matters as well. In 1/72, heavy gravel can look like boulders, and coarse grass fibres can overwhelm a figure. In 1/35, very fine scenic textures can disappear once painted and weathered. Matching texture size to the kit scale is one of the simplest ways to improve realism.
Groundwork materials that form the base
Most military dioramas begin with structure. Insulation foam, MDF bases and styrene sheet are common foundations because they are easy to shape and stable once sealed. Foam is especially useful if you need raised banks, shell craters, dugouts or sloped roads. A solid base board gives the finished piece enough rigidity to handle transport and display.
On top of that structure, modellers generally use groundwork pastes, texture gels or plaster-based materials to establish soil and terrain. Ready-made earth textures are popular because they save time and give a consistent finish, particularly if you are building multiple projects in similar environments. They are useful for roads, embankments and rough pasture, and they take paint, pigment and weathering products well.
Plaster and filler still have their place, especially for custom shaping. They are affordable and versatile, but they can crack if applied too thickly and may need sealing before painting. Texture pastes tend to be more forgiving, especially for less experienced builders, though they often cost more per project.
Natural sand and sifted soil can work, but there is a trade-off. They often look excellent once fixed in place, yet they can introduce inconsistent grain size or unwanted organic matter if not prepared properly. Purpose-made scenic aggregates remove that uncertainty and are usually easier to match across a build.
Mud, dust and earth effects
Military subjects rarely sit on perfectly clean ground, so earth effects are where a scene starts to feel believable. Pigments are especially useful here because they let you vary tone without hiding texture. Dry dust tones suit summer roads and depot yards, while darker earth shades help with wet ground, woodland tracks and recently disturbed soil.
Mud products, enamel splatter effects and textured earth mixtures are best used with restraint. Heavy mud can add drama, but if the lower hull is caked in deep sludge while the surrounding base looks dry, the scene stops making sense. The terrain, running gear and figure boots should all tell the same weather story.
Vegetation and foliage for military scenes
Grass, weeds and undergrowth are often what separates a clean display base from a proper diorama. Static grass is the standard starting point for fields, verges and neglected ground, but a single length and colour can look artificial. Mixing tones gives a more natural result, particularly in temperate European settings where greens, straw shades and patchy earth often sit together.
Tufts are useful for quick placement around track edges, fence lines and ruined walls. They also help break up open areas that would otherwise look bare. For a more established scene, foliage clumps, leaf scatter and fine turf can suggest scrub, hedgerows and forest-floor cover.
The key is to think about military traffic. An area crossed by half-tracks or tanks should show flattened grass, broken edges and exposed soil. Overgrown vegetation suits abandoned positions, long-defended strongpoints or derelict post-war scenes, but it would look odd on an active frontline road.
Trees and branches can become focal points very quickly, so scale and species matter. Armatures with fine leaf material generally look more convincing than chunky hobby trees intended for train layouts, especially in 1/35 and larger scales. If a tree dominates the scene, it needs nearly as much thought as the vehicle itself.
Rubble, masonry and urban debris
Urban warfare scenes rely on texture contrast. Brick, plaster dust, shattered timber, twisted metal and broken paving all need to read clearly without turning the base into visual clutter. Purpose-made rubble mixes are useful because they combine different particle sizes in one product, which saves time and usually looks more natural than a single-size aggregate.
Styrene sheet, foamboard and plaster castings are common for walls, kerbs and ruined structures. They are easier to control than scavenged materials, and they let you keep brick courses, paving slabs and damage in scale. Fine dust pigments help unify the debris afterwards so everything looks as though it belongs to the same collapse rather than being placed separately.
Spent casings, barbed wire, broken crates and battlefield clutter can strengthen the story, but this is where many dioramas become overcrowded. If every corner has a dramatic detail, the eye has nowhere to settle. Usually, one strong structural feature and a few supporting debris elements are enough.
Water, snow and seasonal effects
Water products can be excellent for river crossings, puddles, drainage ditches and shell holes, but they need planning. Deep pours may shrink or cure unevenly, and some clear products work better for shallow standing water than for larger bodies. For most military dioramas, puddles and damp patches are more believable than ambitious lakes.
Wet effects are also useful on mud, track marks and roadside ruts. A satin or gloss finish applied selectively can make a base feel much more dynamic. The mistake is covering everything in shine. Real terrain tends to vary, with damp hollows, drying edges and matte high spots.
Snow products work best when the whole model supports the environment. A winter base needs cold weather tones on the vehicle, subdued dust colours and sensible accumulation on horizontal surfaces. Bright white snow on a warm-toned, dusty tank usually looks disconnected. Texture, translucency and placement matter more than sheer volume.
Adhesives, paints and finishing products
The supporting materials are just as important as the scenic ones. PVA glue is still a staple for fixing sand, static grass and scatter. Cyanoacrylate helps with resin, metal details and awkward small parts. Acrylic matt medium is useful when you need a stronger scenic binder with less surface sheen than basic glue.
Paint ties everything together. Even excellent raw textures benefit from a unified paint pass, washes and dry-brushing. Earth tones, greys, dusty buffs and faded greens are the backbone of most military groundwork. Weathering products then help blend the vehicle into the scene so it looks placed in the environment rather than set on top of it.
This is also where compatibility matters. Acrylics, enamels, pigments and texture products can all work together very well, but the order matters. If you are building in layers, let each one cure properly before moving on. Rushing groundwork is one of the quickest ways to lift texture, smear colours or trap gloss where you do not want it.
What to buy first if you are building your first military diorama
If you are starting from scratch, do not try to cover every scenic possibility in one order. A practical first set usually includes a base, groundwork paste, fine aggregate, pigment, static grass or tufts, PVA and a couple of weathering tones suited to the subject. That will cover a large percentage of rural and roadside military scenes.
If your interest is urban armour or wartime street fighting, switch the vegetation emphasis for rubble, plaster, sheet material and dust effects. The point is not to buy broadly. It is to buy around the scene you actually plan to build.
That is where a specialist range really helps. Being able to browse by scenic category, scale and finishing task makes it much easier to assemble a coherent set of materials rather than a random mix of products. At Scale Model Shop, that kind of project-led shopping is exactly what makes military diorama building less fragmented and far more enjoyable.
The best diorama materials are not necessarily the most expensive or the most advanced. They are the ones that match your scale, your subject and the ground your vehicle ought to be standing on. Start with that logic, and every added texture, tuft, pigment and puddle will do more than decorate the base – it will support the story you are trying to tell.