
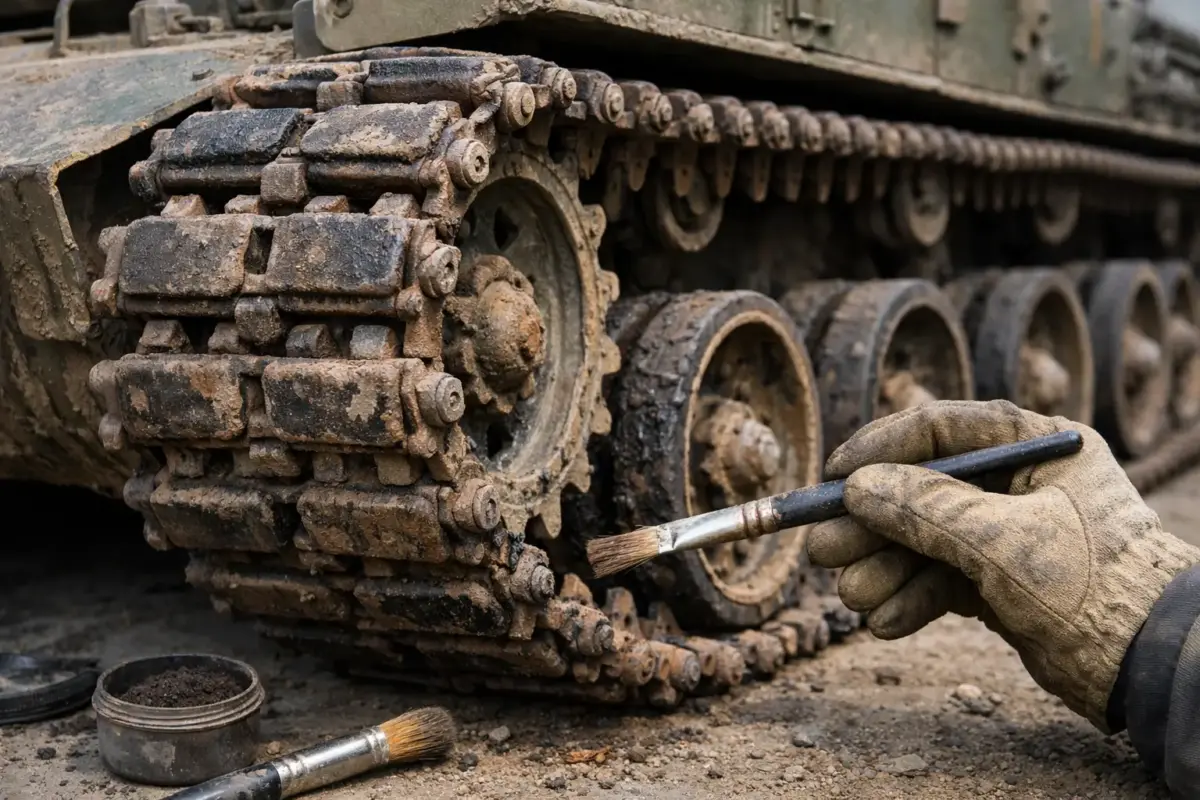
Tank tracks can make or break an armour build. Even a carefully painted hull can look unfinished if the running gear is a single dark brown shape, while overworked tracks can quickly distract from the vehicle itself. Learning how to weather tank tracks is less about adding every available effect and more about matching the finish to the vehicle, terrain and moment you want to portray.
The most convincing tracks show variation: dark recesses, exposed metal on contact points, earth caught around the guide horns and a controlled build-up of dust or mud. Start with reference photographs where possible, but remember that a vehicle on a wet training ground will not weather like one operating on a dry summer road. Scale matters too. A heavy clump of textured mud that works on a 1:16 model may look like a boulder on a 1:72 tank.
Start with the vehicle’s story
Before reaching for pigments or metallic paint, decide where the model has been and how recently it has moved. Tracks constantly shed material as they rotate, so fresh mud is usually concentrated in the recesses, around the sprockets, between road wheels and on the lower hull. Dry dust settles more evenly, but is often disturbed on the outer faces and raised edges.
The track type also affects the result. Steel tracks develop bright wear on the guide teeth, cleats and surfaces that strike the ground. Rubber-padded tracks generally show a darker, more subdued finish, with worn rubber, dusty side faces and only limited exposed metal. Rubber-band tracks, individual plastic links, workable metal tracks and moulded kit tracks all take weathering differently, so test your chosen method on a spare link or hidden section first.
Do not assume all tracks begin rusty. Operational steel tracks are continually polished by movement. Rust is most appropriate in protected recesses, on stored vehicles, or on a neglected museum subject. For a vehicle in service, dark steel, earth staining and selective bright metal usually look more credible than an all-over orange-brown finish.
Prepare and paint the running gear
Clean assembled tracks before painting, particularly metal aftermarket sets that may retain oil from manufacture. If the tracks are separate from the hull, paint them before final fitting where practical. This gives better access to the inner faces, sprockets and wheel contact areas. On some kits, however, fitting the tracks first is necessary to establish the correct sag. In that case, protect nearby painted surfaces while working.
A dark primer gives useful depth and makes missed recesses less obvious. Follow with a track base colour rather than plain black. A mix or dedicated shade of dark brown, charcoal, faded black and deep metallic grey creates a more natural foundation. Acrylics are convenient for quick drying and layered brush work; lacquers and enamels can provide a very durable base where ventilation and safe handling are available.
Keep the finish slightly varied from the beginning. Spray or brush a darker tone into the deepest areas, then introduce a warmer brown-grey on outer faces. It should still look too plain at this stage. The variation becomes convincing once dust, washes and metallic wear break up the surface.
How to weather tank tracks in layers
Add depth to the recesses
Apply a thin dark wash to gaps between links, around guide horns and close to the sprocket teeth. An enamel or oil wash is particularly useful because it flows into detail and can be softened after a short drying period with a clean, lightly dampened brush. Acrylic washes also work well, but apply them in smaller areas because they dry faster.
The purpose is not to outline every link evenly. Concentrate the darkest staining where dirt would be trapped and where light naturally struggles to reach. A little irregularity is valuable. Tracks are a mechanical assembly, but their grime is not uniform.
Create the earth layer
Choose soil colours to match the setting. Cool grey-beige dust suits hard-standing, urban rubble and dry roads. Yellow-brown and ochre tones suggest dry earth, while richer umbers and dark browns suit damp ground. Combining two or three close shades is more effective than using one pigment over the whole track run.
For dry dust, work weathering powders into the surface with a soft brush, focusing on the lower run, inner track faces and spaces around the wheels. Fixer can improve durability, but it often darkens pigments, so build the effect gradually. A misted matt varnish can also secure light dust, although it may reduce the soft, powdery finish.
For mud, use textured paste, acrylic mud products or pigments mixed with acrylic resin, enamel effects or a small amount of plaster. Apply it selectively with an old brush. Build it around the lower hull and between track links rather than coating every cleat. Fresh wet mud should be darker and slightly satin in protected areas; dried mud is lighter, flatter and more broken at the edges.
If the model represents a vehicle that has just crossed wet ground and returned to a firm road, a few restrained mud flecks on the hull sides can tie the tracks into the whole vehicle. Keep the direction of splatter believable. Material is thrown rearwards and upwards by moving tracks, not randomly across the turret roof.
Restore worn metal last
Metallic wear is the detail that gives tracks movement, but it needs a light hand. Use a graphite pencil, soft graphite powder, metallic wax or a dark steel acrylic applied by dry-brushing. Focus on the chevron edges or cleats that meet the ground, guide teeth, track pin heads and the inside surfaces that contact the wheels and sprockets.
Avoid bright silver over large areas. Freshly polished steel is rare on a full-scale vehicle and can look exaggerated under display lighting. Dark steel or gunmetal graphite is usually the better choice, with tiny brighter accents only on the highest points. Apply this stage after dust and mud so the metal appears to have been revealed by contact and movement.
Balance the tracks with the rest of the model
Tracks should not be weathered in isolation. Road wheels, return rollers, idlers, sprockets and lower hull all share the same environment, but they receive it differently. Dust tends to gather in wheel rims and around suspension arms. Mud collects behind wheels and beneath mudguards. Sprocket teeth often show polished contact surfaces where they engage the links.
This is where a test fit is especially useful. Refit the tracks temporarily and assess the overall value of the lower hull. If the tracks disappear into a very dark undercarriage, lift selected outer faces with dust or graphite. If they are much lighter than the wheels, add a thin filter or dusty wash to bring the colours together. The goal is visual connection, not identical finishes.
For a small-scale kit, simplify the recipe. A dark base, carefully placed dusty dry-brushing and restrained graphite can read better than heavy texture. In 1:35 and larger, finer pigment layers, wet effects and individual clumps of earth become more visible and worthwhile. The right level of detail depends on the scale, the kit’s moulding and how close the finished model will be viewed.
Common tank track weathering mistakes
The most common error is treating every raised surface as shiny metal. Remember that steel wears where it contacts the ground, wheels or sprocket, not across every exposed face. Another is applying mud as one thick, even coat. Real mud dries, breaks away and varies according to moisture, speed and terrain.
Be careful with symmetrical effects. Matching dust marks on each side can look artificial, especially on a vehicle positioned in a diorama. One track may have run through softer ground, climbed a kerb or sat deeper in a puddle. A small difference between sides adds authenticity without becoming theatrical.
Finally, leave enough time between layers. Enamel washes, pigment fixer and textured mud products can react unpredictably if covered too soon. Let each stage cure, then judge the model under the same light in which it will be displayed. If an effect feels too strong, it is usually easier to soften it with a dusty filter or careful removal than to repaint the entire assembly.
A well-finished track run rewards close inspection, but it should still support the vehicle above it. Build the effects slowly, use the terrain as your guide, and stop when the tracks look as though they have travelled through the scene rather than been decorated for it.
