A well-rigged ship model can look convincing or slightly off with very little in between. The difference is often not the mast alignment or the paint finish, but the ship model rigging thread itself – its thickness, surface texture, colour and how it behaves under tension all affect the final result.
Why ship model rigging thread matters
Rigging is one of the first details the eye reads on a sailing ship. If the thread is too fuzzy, too shiny or too thick for the scale, even a carefully built hull can lose credibility. If it is too fine or too elastic, it may be easier to fit but harder to control, and the finished lines can look slack or inconsistent.
That is why choosing thread is not just a buying decision. It is part of scale planning. Standing rigging, running rigging and finer decorative lines often need different diameters and sometimes different materials as well. On smaller scales, tiny changes in thickness are very obvious, while on larger scales the wrong surface finish can make the whole model look toy-like.
What to look for in ship model rigging thread
The first question is scale. A 1:350 sailing ship and a 1:72 period warship do not ask for the same approach. On very small kits, the finest thread available is often still slightly overscale, so the goal becomes visual balance rather than strict mathematical accuracy. On larger wooden ship models, you have more room to represent the hierarchy of heavier shrouds, finer ratlines and lighter running lines properly.
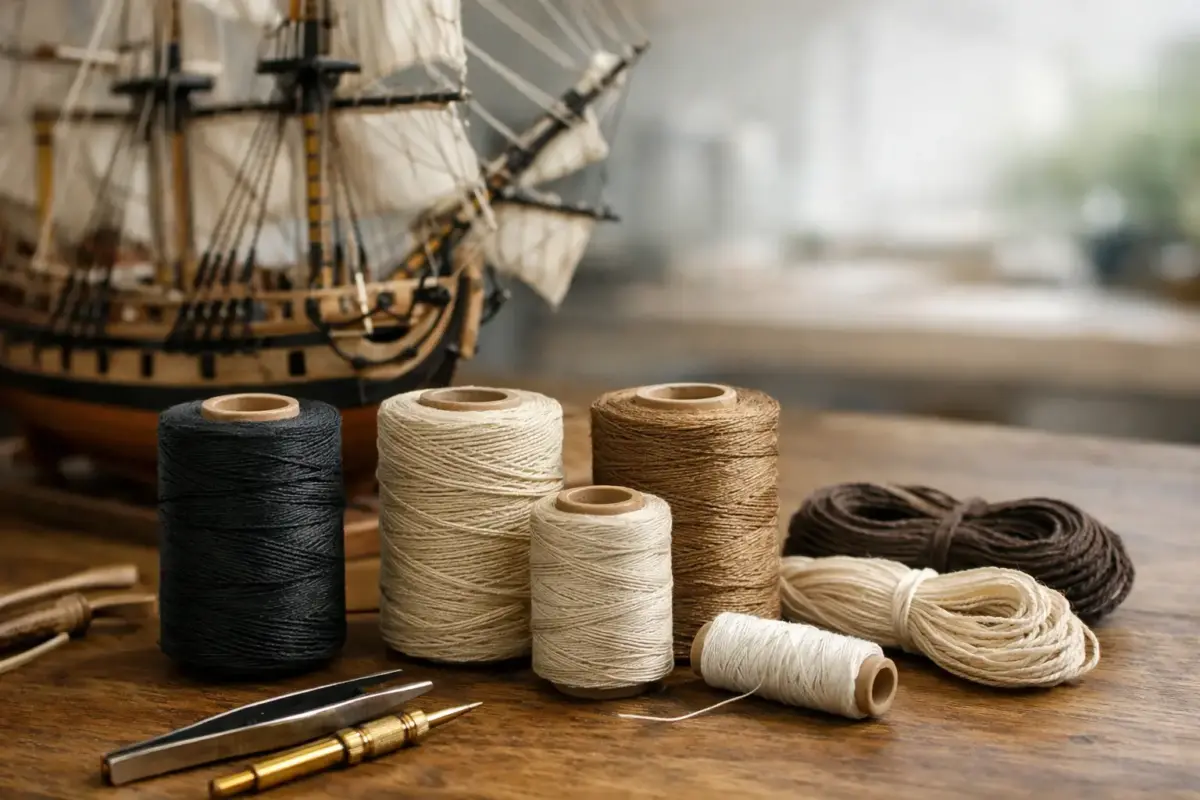
Surface finish matters just as much as thickness. A good rigging thread should sit cleanly, hold a knot reasonably well and avoid obvious fluff. Threads with heavy fuzz can be frustrating because each line catches the light, making the rigging look untidy even when it is correctly laid out. A slightly matte finish usually looks more convincing than a glossy one.
Colour is another point where realism and practicality meet. Black or very dark brown often works for standing rigging. Tan, buff or light brown is commonly used for running rigging. That said, it depends on the vessel, period, finish and scale. Many modellers slightly darken lighter thread with washes or pigments to stop it looking too fresh from the packet.
Common thread types and how they behave
Cotton thread is familiar, widely used and often easy to knot. It tends to look natural, especially on traditional sailing subjects, but quality varies a great deal. Cheaper cotton can be hairy and inconsistent in diameter, which becomes a problem when viewed close up.
Polyester thread is usually stronger and cleaner in finish. It can be a good option when you want reliable tension and fewer fibres standing proud. The trade-off is that some polyester threads can look a little slick or synthetic unless the finish is suitably matte.
Waxed thread is popular with many ship modellers because it handles neatly and resists fluff better than untreated alternatives. It can also make knotting more predictable. The downside is that heavily waxed thread may look too heavy for very fine scales, and excess wax can pick up dust if overdone.
Elastic rigging line has a place, especially on smaller models or where maintaining tension is difficult. It is more common in aircraft modelling, but some ship modellers use fine elastic materials for selected applications. It helps avoid sagging, although it does not always look quite right for every rigging run, particularly where a more natural drape or knot detail is wanted.
For many builds, there is no single perfect material. A mixed approach is often the better one. Heavier fixed lines may suit one product, while finer control lines benefit from another.
Matching thread thickness to scale
This is where many builds are won or lost. If every line is the same diameter, the rigging quickly becomes flat and over-simplified. Real ships carried a visible range of line sizes, and even a modest attempt to reflect that will improve the model.
On smaller injection-moulded kits, you may only need two or three thread sizes to create a convincing effect. A heavier thread for shrouds and stays, a medium one for major running lines and a very fine one for secondary detail is often enough. On larger wooden kits, you can be more selective and represent the rigging plan with greater fidelity.
There is also a practical limit. Very fine thread may be correct on paper but difficult to handle, especially around belaying points or deadeyes. If a line constantly twists, frays or disappears in the tweezers, stepping up one size can be the smarter choice. A build that looks clean and intentional usually reads better than one that is theoretically exact but poorly controlled.
Handling and preparation
Even good ship model rigging thread benefits from preparation. Running the thread through beeswax or a suitable thread conditioner can reduce fuzz and help it keep a straighter line. Some modellers prefer to pre-stretch certain materials gently before use, especially if there is any sign of later slackening.
Cut lengths with a little margin rather than trying to work exactly to final size from the start. That gives you room for knots, trimming and adjustment. Fine pointed scissors and sharp side cutters both earn their place here, depending on the material.
It is worth testing how the thread reacts to adhesive before committing to the model. Thin cyanoacrylate can secure knots neatly, but some threads darken noticeably or wick glue farther than expected. PVA gives more working time and can be useful for positioning, though it is less immediate. The right choice depends on where the line sits and how visible the fixing point will be.
Avoiding the usual rigging problems
Sagging lines are usually a tension issue, but not always. Sometimes the thread itself is stable and the anchor point is weak. Sometimes too much glue has created a brittle join that lets go later. Working in a logical sequence helps – establish the main structural lines first, check alignment, then move to the secondary runs.
Fuzz is another regular problem. If the thread is naturally hairy, trimming individual fibres after installation can become tedious very quickly. A cleaner thread from the outset saves time. Gentle waxing, careful handling and keeping the work area free of dust all help as well.
Scale creep is more subtle. A modeller starts with a sensible thread size, then uses slightly thicker line for ease of handling, then repeats that choice throughout the build. Before long, the whole rigging arrangement looks heavy. Keeping two or three clearly separated diameters on the bench is a simple way to avoid that drift.
Building a sensible rigging selection
If you are buying for a new project, think in terms of a small working range rather than one all-purpose spool. Most ship modellers benefit from having at least a fine, medium and heavy option available, plus a couple of colour choices. That makes it easier to react to the rigging plan as the build develops.
This is also where a specialist retailer is useful. Rather than piecing together supplies from general craft sources, you can choose materials with modelling scale, finish and compatibility in mind. At Scale Model Shop, that usually means being able to source thread, tools, adhesives and finishing products for the same build without guesswork.
Ship model rigging thread for different project types
Plastic sailing ship kits often need thread that behaves well straight from the packet. Many modellers working in these scales want something fine, dark and low-fuss, because the moulded parts are already delicate and the aim is clean presentation rather than museum-level ropework.
Wooden ship kits are different. Here the rigging is often a core part of the project, not an afterthought, and the visual distinction between line types matters more. A thread with a natural look, good knot control and several available diameters is usually the better fit.
Display standard and competition builds raise the bar again. At that point, thread consistency, colour restraint and scale layering become far more noticeable. The best choice is often the one that disappears into the model as a believable material rather than drawing attention to itself.
The right rigging thread will not do the work for you, but it will remove a lot of unnecessary friction from one of the most demanding stages of ship modelling. Choose for scale first, handling second and appearance all the way through – and your rigging will start to support the model instead of competing with it.