
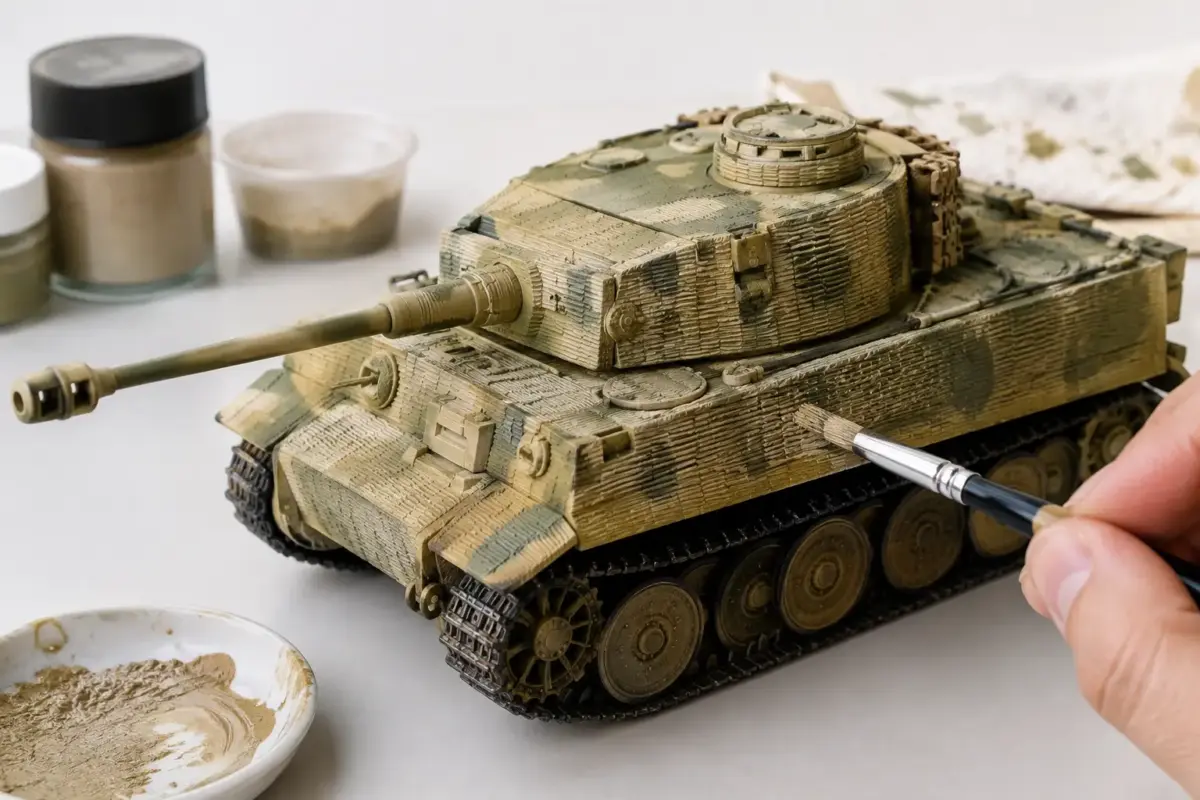
Zimmerit can make a German AFV look exceptionally convincing, but it also exposes rushed painting. The anti-magnetic paste creates hundreds of tiny ridges, grooves and broken edges that react to paint, washes and dry-brushing differently from a smooth hull. Learning how to paint Zimmerit texture is less about using more products and more about applying each layer with control, so the relief remains visible rather than becoming a dark, muddy surface.
Zimmerit was applied to many German vehicles from late 1943 until autumn 1944, including Panthers, Tigers, StuGs and some Panzer IVs. Check references for the precise vehicle, factory, date and unit before committing to a finish. Pattern, coverage and camouflage all varied, and many late-war vehicles did not carry it at all.
Prepare the Zimmerit before paint
Whether your model has moulded Zimmerit, an aftermarket resin surface or putty texture you have applied yourself, inspect it under a strong lamp before priming. Remove sanding dust, loose putty crumbs and any fragments trapped in the grooves. A soft brush and a gentle wash in warm water are usually enough for plastic parts. Resin parts should also be cleaned carefully to remove mould-release residue.
Zimmerit has high points that are easy to damage during handling, particularly on finely cast resin sets. Assemble as much of the hull and turret as practical, but leave off tools, spare track links, tow cables and fragile fittings where they would block access. Painting the textured armour cleanly first makes it far easier to add separate equipment later.
Use a thin, even primer coat. Grey or black-grey primer is a dependable choice for most German armour schemes, while a warm brown primer can work well beneath Dunkelgelb and chipped finishes. Avoid flooding the surface. Heavy primer is the first way to soften the texture you have paid for or spent time creating.
Choosing the right base colour
Most Zimmerit-equipped vehicles were finished in Dunkelgelb, often with field-applied olive green and red-brown camouflage. The exact appearance depended on factory paint, thinning, weathering and the conditions in which the vehicle served. A single flat yellow straight from the bottle can look toy-like on such a large, textured area.
Start with a slightly darker and less saturated version of your intended overall colour. Airbrush it in several light passes, keeping the spray moving and approaching the side armour from different angles. This prevents pale paint building up only on the ridge tops while the recesses remain bare or unnaturally dark.
For brush painters, thin acrylic paint modestly and use a good-quality flat or filbert brush. Work across small panels, pushing paint into the grooves without scrubbing hard enough to leave brush marks on the raised pattern. Two or three thin coats will preserve the texture far better than one opaque coat.
Add controlled tonal variation
Once the base coat has cured, lighten the original mix with a small amount of pale yellow, buff or off-white. Spray this colour gently across upper hull surfaces, turret roofs and the upper portions of vertical side plates. Do not try to hit every individual ridge. The aim is to establish a subtle faded direction of light, not create a striped pattern.
On a vehicle with pronounced combed Zimmerit, a very light pass from above naturally catches the high points and begins to define the pattern. Keep the effect restrained. Strong pre-shading or sharply contrasting panel modulation can make Zimmerit resemble a zebra crossing rather than a ceramic anti-magnetic coating.
If the vehicle wears camouflage, spray or brush the disruptive colours after the initial Dunkelgelb modulation. Soft-edged field camouflage benefits from a fine airbrush setting and low pressure, but hard-edged schemes can be masked with putty or paper held slightly away from the surface. Again, use thin paint. Thick green or red-brown coats are especially prone to filling fine grooves.
How to paint Zimmerit texture with filters
Filters are particularly useful on Zimmerit because they alter the overall tone without hiding the physical texture. Apply a very diluted enamel or oil colour over a sealed satin or gloss surface, using a soft brush and allowing capillary action to carry it across the ridges. Ochre, faded yellow, olive and earth tones are useful over Dunkelgelb, depending on the theatre and level of weathering you want.
Use several gentle filters rather than one dramatic colour change. Let each coat dry before judging the next. On Zimmerit, a filter often gathers slightly around ridge edges and gives an attractive variation that is difficult to recreate with opaque paint alone.
A clear gloss or satin varnish before enamel work makes cleanup safer, especially if you are still refining your technique. Satin is often the better compromise on textured armour: it gives washes enough flow while retaining more visual grip than a high-gloss finish. Acrylic washes can also work, but they dry faster and give less time for adjustment.
Pin washes: let the detail do the work
Zimmerit needs a selective pin wash, not a blanket dark wash. A broad dark brown wash over the whole hull tends to pool in every recess, reducing the scale effect and making the surface look damp or neglected. Instead, use a fine pointed brush to place a dark brown-grey wash around weld seams, hatches, hinges, bolts, vision blocks and the base of fittings.
On the Zimmerit itself, apply small touches sparingly in the deepest recesses or beneath damaged sections. Allow the wash to settle, then soften any hard tide marks with a clean brush lightly dampened with thinner. The raised texture should read through changes in light and tone, not through black lines around every ridge.
A darker wash is appropriate around engine grilles, lifting hooks and the lower hull, where grease, shadow and grime collect naturally. Keep the upper turret sides lighter. This contrast helps the vehicle retain shape without turning the finish into a uniformly grimy brown mass.
Dry-brushing and highlights without a frosted finish
Dry-brushing is useful for Zimmerit, but it is also the easiest stage to overdo. Choose a highlight colour only slightly lighter than the base coat – not pure white or a pale cream unless you are representing extreme sun bleaching. Remove almost all paint from a soft, worn flat brush, then draw it lightly across the raised pattern.
Build highlights in passes. Concentrate on upper-facing ridges, damaged patches, hatch surrounds and exposed turret corners. If the texture suddenly looks chalky from normal viewing distance, stop and blend the result with a light filter or a misted coat of the base colour.
An alternative is oil paint rendering. Place tiny dots of pale ochre, yellow, olive and earth oils on broad panels, then blend vertically with a soft brush dampened in thinner. On Zimmerit this creates subtle shifts between ridges and grooves, with a softer result than dry-brushing. It takes longer to dry, but it offers excellent control on 1/35 armour.
Add chips and damage with restraint
Zimmerit was a paste layer, so damage can reveal different colours depending on how deep the impact is. Very small surface chips may show a darker, stained Zimmerit tone. Larger losses can reveal red oxide primer or bare metal beneath, although bright exposed steel should be used sparingly and generally on fresh damage.
Use a fine brush or small piece of sponge to apply dark brown chips along hatch edges, crew access areas, tow points and exposed corners. Follow selected larger chips with a smaller inner mark of a lighter or metallic tone. Do not repeat the same pattern over every ridge. Random-looking damage still needs logic: crew movement, thrown track, branches, stowage and combat exposure all leave marks in particular places.
Broken Zimmerit is especially effective around lower side plates and prominent corners, but the amount depends on your subject. A well-maintained training vehicle and a hard-used front-line Panther should not receive identical treatment.
Dust, mud and finishing layers
Pigments, textured earth products and diluted enamel deposits can bring Zimmerit into the rest of the vehicle finish. Dust settles most naturally in lower recesses and around the lower hull, while rain streaks run down from bolts, weld seams and the bottom edges of fittings. Apply them in thin layers and assess the model from arm’s length between stages.
Avoid covering every textured panel in heavy mud unless your reference supports it. Zimmerit is one of the focal points of the model, and excessive weathering can conceal it completely. A dusty, worn finish generally shows the pattern better than a thick, uniform layer of dirt.
Finish with a matt or ultra-matt varnish once decals, washes and weathering are fully dry. Test your chosen varnish on a spare textured part if possible. Some very flat finishes can lighten colours noticeably, while others may leave a slight sheen in deep recesses.
The strongest Zimmerit finish is usually the one that asks the viewer to look closer. Keep your paint layers thin, use contrast selectively and let the sculpted pattern catch the light. A few patient passes with the right paints and weathering materials will give your German armour the convincing depth that smooth side armour simply cannot match.
