
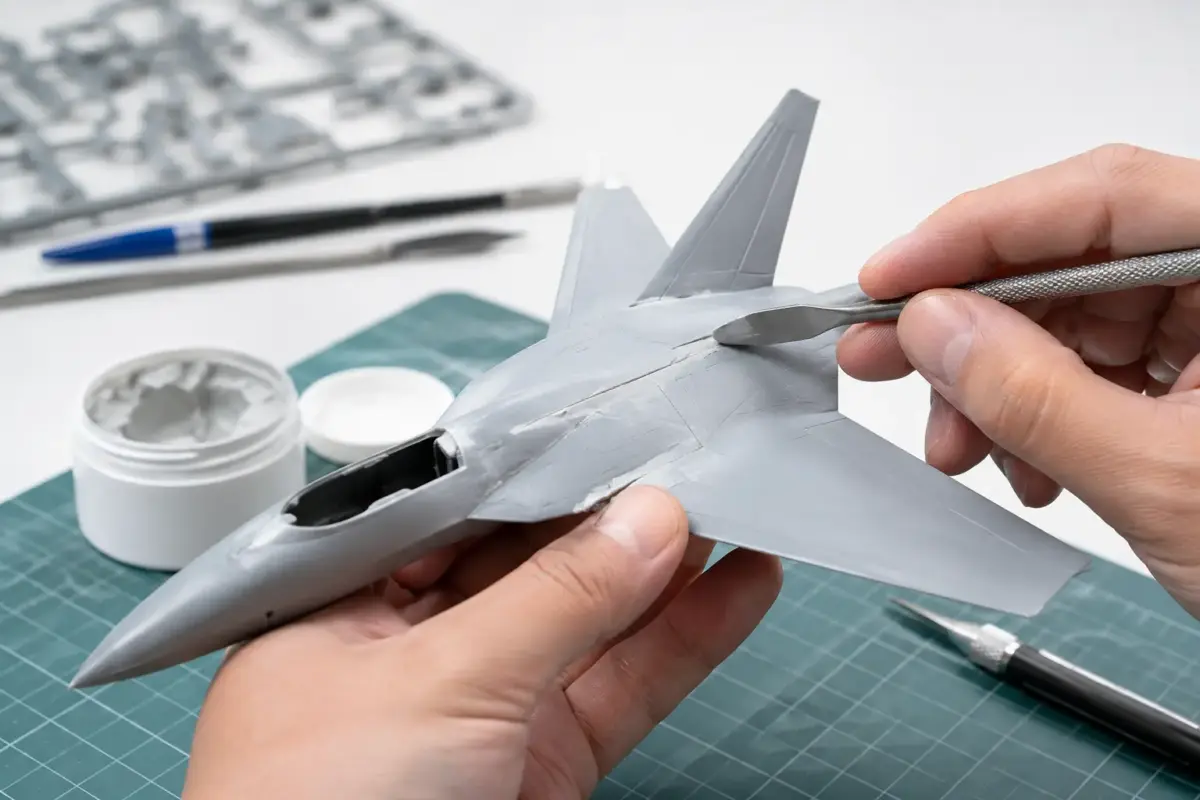
A visible fuselage seam, sink mark or gap around an armour turret can spoil an otherwise careful finish, especially once primer and paint make every flaw stand out. This model putty filling guide covers the practical choices that produce clean joins without erasing nearby rivets, panel lines or fine surface texture.
Filler is not simply a substance for covering mistakes. Used well, it restores the uninterrupted surface that should have been there before the kit was divided into moulded parts. The right material and technique depend on the size of the defect, the plastic involved and how much surrounding detail must be protected.
Start by deciding whether filler is needed
The best filling job begins before any putty is opened. Test-fit the parts, remove moulding nubs from mating surfaces and check that locating pins are not holding the halves apart. A slightly warped fuselage, hull or wing root may need gentle adjustment and a firm bond rather than a thick layer of filler.
For narrow seams, running liquid cement into the join and pressing the parts together can create a small bead of softened plastic. Once fully cured, this can be scraped and sanded back with no change in hardness between seam and surrounding kit plastic. It is often the cleanest approach on conventional polystyrene kits, but it requires patience and will not bridge an actual gap.
A simple rule helps: use cement or plastic shims to solve a fit problem first, then use filler to refine the surface. Putty applied over a moving, poorly supported join is likely to crack later.
Choosing filler for the job
There is no single best filler for every model. Keeping two or three types on the bench gives far better control across aircraft, armour, ships, figures and railway structures.
Traditional solvent-based modelling putty is useful for shallow seams, minor sink marks and small mould flaws. It is easy to spread, readily available and sands smoothly, although it can shrink as it cures. Apply it in thin layers rather than trying to fill a deep void in one pass. For delicate styrene, avoid flooding the area with thinner, as aggressive solvents can soften detail.
Water-based acrylic fillers are particularly handy around engraved panel lines, raised details and clear parts because surplus material can often be wiped away with a damp cotton bud before it dries. They are excellent for hairline gaps but less suitable for structural repairs or deep holes. Their softer finish also means they can sand away faster than the kit plastic.
Two-part epoxy putty suits deeper gaps, reshaping work and areas that need a longer working time. It can be pressed into a hollow nose cone, blended around figure conversions or used to recreate missing fabric texture. Wet tools and fingertips prevent sticking while it is fresh. The trade-off is that epoxy putty takes longer to cure and may require more careful sanding once hard.
Cyanoacrylate adhesive, often called super glue, can act as a fast, hard filler for fine seams and small chips. It is useful where you need to re-scribe a line across the repair, because it generally resists a scriber better than soft putty. Sand it soon after it has set but before it becomes harder than the surrounding plastic. Apply sparingly: excess glue can create a ridge that takes longer to remove than the original seam.
For wider gaps, use styrene strip, sheet or stretched sprue as a backing or insert, then finish the edges with your chosen filler. This is stronger and more economical than packing a large cavity entirely with putty.
Model putty filling guide: application and shaping
Clean the repair area first. Dust, sanding residue and skin oils reduce adhesion, particularly on resin and photo-etched parts. On resin, a light wash in warm soapy water before assembly is sensible, while a gentle scuff with fine abrasive gives filler more grip where required.
Apply only enough putty to cover the defect and sit just proud of the surface. A small metal spatula, old blade, sculpting tool or cocktail stick works well, depending on the location. Press the filler into the seam rather than merely dragging it along the top. This matters on wing roots and hull joins, where an apparently filled line can contain a void underneath.
Masking tape either side of a seam is worth the minute it takes on highly detailed areas. It limits spread, keeps raised detail clean and reduces the amount of sanding needed. Remove the tape while the filler remains workable, following the manufacturer’s drying guidance.
Allow adequate curing time. A surface that feels dry may still be soft below, and sanding too early can pull filler from the gap or leave a depressed seam that only appears under primer. Solvent putties in particular can continue shrinking after their first sanding, so deeper applications benefit from an overnight cure.
Sand without flattening the model
Begin with the least aggressive abrasive that will level the filler. Fine sanding sticks are useful for broad, accessible surfaces, while small folded pieces of abrasive paper reach tight corners around intakes, suspension units and cockpit coamings. Work through progressively finer grades to remove the scratches left by the previous stage.
Use a sanding block on flat aircraft wings, vehicle glacis plates and ship hull sides. Sanding with a fingertip alone follows every contour, including the unwanted high spot, and can leave a wavy finish. Conversely, curved fuselages, turrets and figure limbs need a flexible backing or carefully controlled finger pressure so their natural form remains intact.
Wet sanding reduces airborne dust and helps fine abrasives cut smoothly, but it is not appropriate for every product. Check the filler type first, and keep water away from unsealed paper, exposed metal parts and areas where it could become trapped inside the model.
Stop regularly, wipe the surface clean and inspect it from several angles under a strong lamp. Primer is the honest test. A thin coat of grey, black or white primer reveals ghost seams, pinholes and sanding scratches that bare plastic often hides. Address these with a small second application rather than adding a heavy coat of primer in the hope that it will conceal the problem.
Protecting detail around a repair
A good repair should not trade one flaw for another. Raised rivets, bolt heads, weld beads and non-slip texture are easy to lose beneath filler or abrasive. Before filling, consider whether the detail can be protected with tape, avoided with a water-clean-up filler, or replaced afterwards.
On aircraft, re-scribe lost panel lines only after the surface is fully level. Place a flexible guide tape or thin metal rule along the intended line, then make several light passes with a scriber rather than one deep cut. If the line crosses a super-glue repair, a fresh, sharp tool helps prevent chipping.
Armour builders may need to restore cast texture or weld seams. A stippling motion with liquid cement and a stiff brush can recreate subtle cast steel on suitable plastic surfaces, while fine epoxy putty can be rolled into weld beads and textured with a blade. Keep references close: texture should support the scale effect, not become exaggerated.
For clear parts, avoid conventional solvent putty wherever possible. Fit the part carefully, mask it before adjacent work and use a compatible water-based filler for tiny gaps. Any sanding near glazing should be minimal and deliberate.
Common filling problems and their cause
If a seam reappears after painting, the usual cause is uncured or shrinking filler, or movement in the underlying joint. If the repair sands lower than the surrounding surface, the filler was probably too soft for the area or applied before a gap was properly backed. Pinholes often indicate that thick putty trapped air, while a cracked repair usually points to a flexible join beneath a rigid filler.
Do not judge every seam by the same standard. A 1/72 aircraft canopy frame, a 1/35 tank hull join and a 28 mm gaming figure each demand different levels of precision and different tools. Matching the filler to the task saves time, preserves detail and makes the painting stage much more satisfying.
A well-stocked bench with fine abrasives, masking tape, styrene strip, a dependable primer and a selection of fillers means you can deal with fit issues as they arise rather than compromise the build. If you are choosing products for a particular kit or material, the Scale Model Shop team can help you narrow down a practical combination for the job.
