
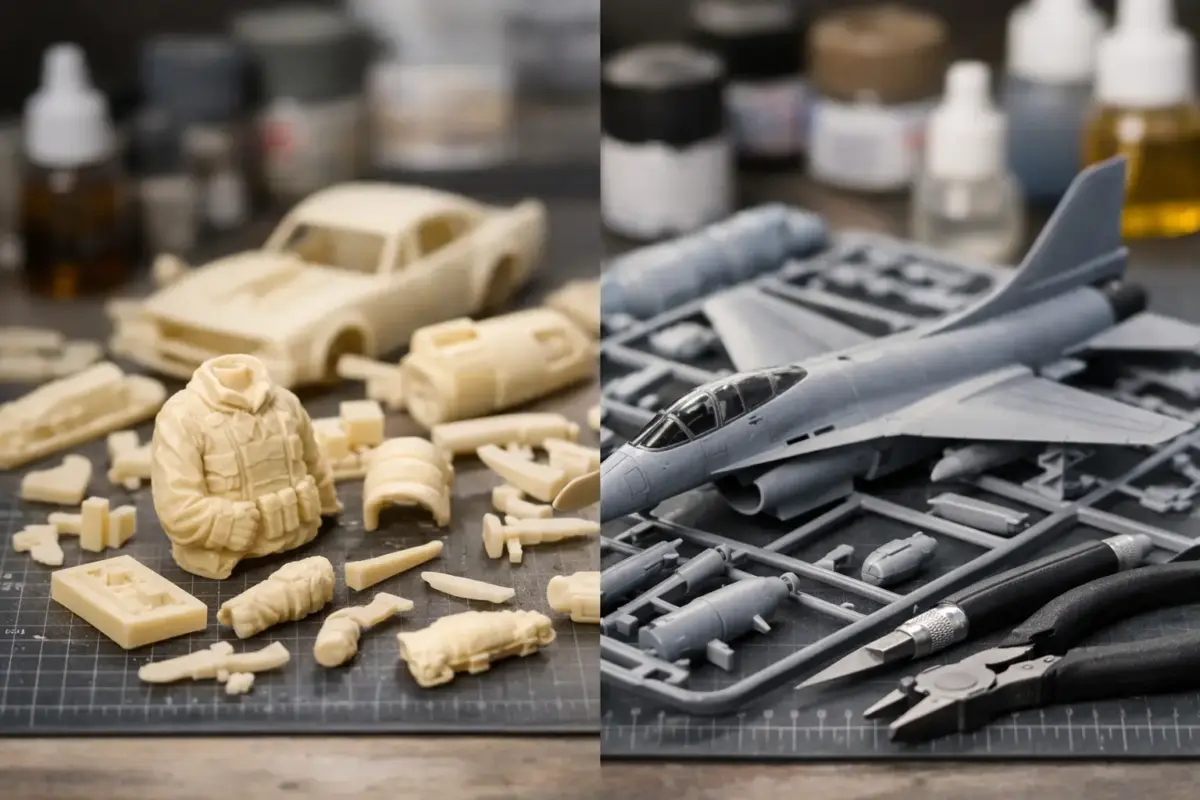
A finely cast resin cockpit, a limited-run conversion for an obscure RAF subject, or a full injection-moulded kit with hundreds of crisply engineered parts can all make a compelling next project. The resin kits vs plastic kits question is not really about which material is superior. It is about choosing the kit that suits your preferred subject, building experience, available tools and the finish you want to achieve.
For many modellers, plastic remains the most straightforward route from box to display shelf. Resin, however, opens the door to subjects and levels of surface detail that conventional mainstream releases do not always cover. Knowing what each material asks of you will make the purchase – and the build – far more rewarding.
Resin Kits vs Plastic Kits: The Core Difference
Most plastic model kits are injection moulded. Polystyrene is forced into precisely machined metal moulds, producing consistent sprues with locating pins, tabs and, in modern kits, increasingly sophisticated engineering. Major manufacturers can make large production runs economically, which is why plastic kits dominate popular aircraft, armour, ship and automotive subjects.
Resin kits are cast in flexible silicone moulds, usually in much smaller batches. This process makes short production runs practical and allows specialist manufacturers to tackle niche variants, rare vehicles, unusual scales and detail sets that would be too expensive to tool in injection-moulded plastic. Parts are often supplied attached to casting blocks or pour stubs rather than conventional sprues.
That difference in production method affects almost every stage of the build. Plastic tends to offer more predictable assembly. Resin can provide exceptional detail and uncommon subject matter, but it often requires more preparation, test-fitting and modeller input.
Detail, Accuracy and Subject Choice
Resin is capable of capturing very fine recessed lines, subtle fabric texture, thin panels and complex shapes. Cockpits, engine bays, ejector seats, stowage and figure sculpts are common examples where resin can look markedly sharper than older plastic alternatives. A quality resin replacement part can transform a visible area of a model without requiring extensive scratch-building.
Full resin kits also have an important place in collections built around specific historical subjects. If you are looking for a little-produced armoured vehicle, a conversion of a particular aircraft mark, or a regional railway structure, resin may be the only viable option in your chosen scale.
Plastic should not be mistaken for a lesser medium. Modern injection-moulded kits from leading manufacturers can have outstanding surface detail, accurate outlines and clever construction. They are also better placed to include clear parts, alternative poses, opening panels and multipart assemblies at a sensible price. For a widely modelled Spitfire, Tiger I or contemporary aircraft, a modern plastic kit will often give excellent fidelity with less effort.
Accuracy depends on the individual kit, not the material alone. Research the specific release, its scale and its manufacturer. A highly detailed resin kit can still reflect dated research, while a well-designed plastic kit may be the more accurate representation.
Fit and Building Experience
The most immediate practical advantage of plastic is its familiar assembly process. Parts are normally removed from sprues with side cutters, cleaned up with a sanding stick and joined using liquid cement or a suitable plastic adhesive. Because the cement slightly melts the mating surfaces, it creates a strong welded joint and gives a little time to adjust alignment.
Resin does not react with standard polystyrene cement. It must be joined with cyanoacrylate adhesive, commonly called superglue, or a two-part epoxy. Cyanoacrylate is quick and convenient, particularly for small parts, but it gives limited working time. Epoxy provides more time to position large or heavy components and can help bridge minor gaps, although it takes longer to cure.
Resin parts may need more careful adjustment. Casting blocks must be removed, mating faces flattened and warped components gently straightened. Locating pins may be absent or minimal, so alignment is determined by your own test-fitting rather than by the kit engineering. This is not a fault in every resin kit. It is simply a normal feature of a lower-volume production method.
For an enjoyable first project, a conventional plastic kit is usually the better choice. It lets you concentrate on basic skills such as seam work, painting and decal application. Resin is a satisfying next step when you are comfortable checking fit, making small corrections and choosing the right adhesive for each joint.
Preparation Matters More With Resin
Before assembly, resin parts should be washed in warm water with a mild detergent, then thoroughly rinsed and left to dry. Mould-release agent can remain on the casting and interfere with primer, paint and glue. A soft toothbrush is useful for gently cleaning engraved detail and awkward recesses.
Inspect every part before committing to assembly. Look for thin flash, small air bubbles, slight warping and pour stubs that will affect the fit. Most issues are manageable with a sharp knife, sanding materials, filler and patience. Dry-fitting is essential, especially around fuselages, hulls, wings and major interior assemblies.
Plastic kits need preparation too, of course. Mould seams, ejector-pin marks and sprue attachment points all benefit from careful clean-up. Yet the work is generally more familiar and easier to predict. Resin rewards a slower approach: clean it, inspect it, test it, then glue it.
Safe Cutting and Sanding
Resin dust should not be treated like ordinary plastic sanding debris. When cutting or sanding cured resin, wear a suitable dust mask or respirator, work in a well-ventilated area and keep dust under control. Wet-sanding is particularly useful because it reduces airborne particles. Wipe down the work surface afterwards rather than brushing dust into the air.
A razor saw is often the safest way to remove substantial casting blocks, especially from thin wings, hull sides or delicate details. Support the part close to the cut and remove material gradually. Trying to twist a large pour stub away can crack the casting or damage an edge that is difficult to restore.
Tools, Paints and Primers
A modeller moving from plastic to resin does not need an entirely new workbench. Good side cutters, a hobby knife, sanding sticks, files, a razor saw, pin vice and drill bits will cover most preparation work. The key additions are cyanoacrylate or epoxy adhesive, appropriate safety protection and a reliable primer.
Primer is especially valuable on resin. It reveals sanding scratches, pinholes and joints before the colour coats go on, while giving subsequent paint a consistent surface to grip. Thin, controlled coats are preferable to one heavy application that could obscure fine detail. The same principle applies to plastic, but resin makes that first inspection coat particularly worthwhile.
Most hobby acrylics, lacquers and enamels can be used over properly cleaned and primed resin. Match the paint system to your usual workflow and the finish you are after. For aircraft and armour, an airbrush helps preserve subtle detail and gives smooth colour transitions. Brush painting remains entirely practical for figures, small details and carefully applied base coats.
Cost, Availability and Value
Plastic kits are usually less expensive for a comparable size because the production volume is much higher. They are widely available, often include decals and instructions of a consistent standard, and offer a broad choice of aftermarket upgrades if you want to add detail later.
Resin kits frequently cost more, especially when a small manufacturer has cast a specialised subject in limited numbers. That higher price reflects lower production runs, more manual handling and the fact that the kit may serve a very focused audience. It is best judged as access to a subject you genuinely want to build, rather than compared only by part count.
There is also a middle ground: resin accessories and conversion sets. Adding a resin cockpit, wheels, seats, tracks or stowage to a plastic base kit can deliver a visible improvement without taking on the full demands of a resin model. This is often the most sensible route for a modeller wanting to develop resin techniques gradually.
Which Kit Is Right for Your Bench?
Choose plastic when you want dependable fit, a wide choice of mainstream subjects and a relaxed build centred on painting and finishing. It is the natural option for beginners, returners and anyone building several projects at once. A well-selected plastic kit also leaves more budget for quality paints, decals, weathering products and display materials.
Choose resin when the subject itself is the priority, when very fine detail matters, or when you are ready for a more hands-on construction process. It suits modellers who enjoy solving small fit problems, researching a variant and putting extra care into preparation. A resin kit is not automatically harder in every respect, but it rarely rewards rushing.
If you are unsure, start with a small resin detail set for a plastic project rather than a complex full resin kit. It will teach you how resin cuts, sands, washes, primes and bonds, while keeping the overall build familiar. Once those processes feel routine, specialist resin subjects become far less intimidating.
The best kit is the one that keeps you looking forward to the next session at the bench. Whether that is a straightforward plastic classic or a rare resin subject, give the preparation the attention it deserves and the finished model will show it.
