
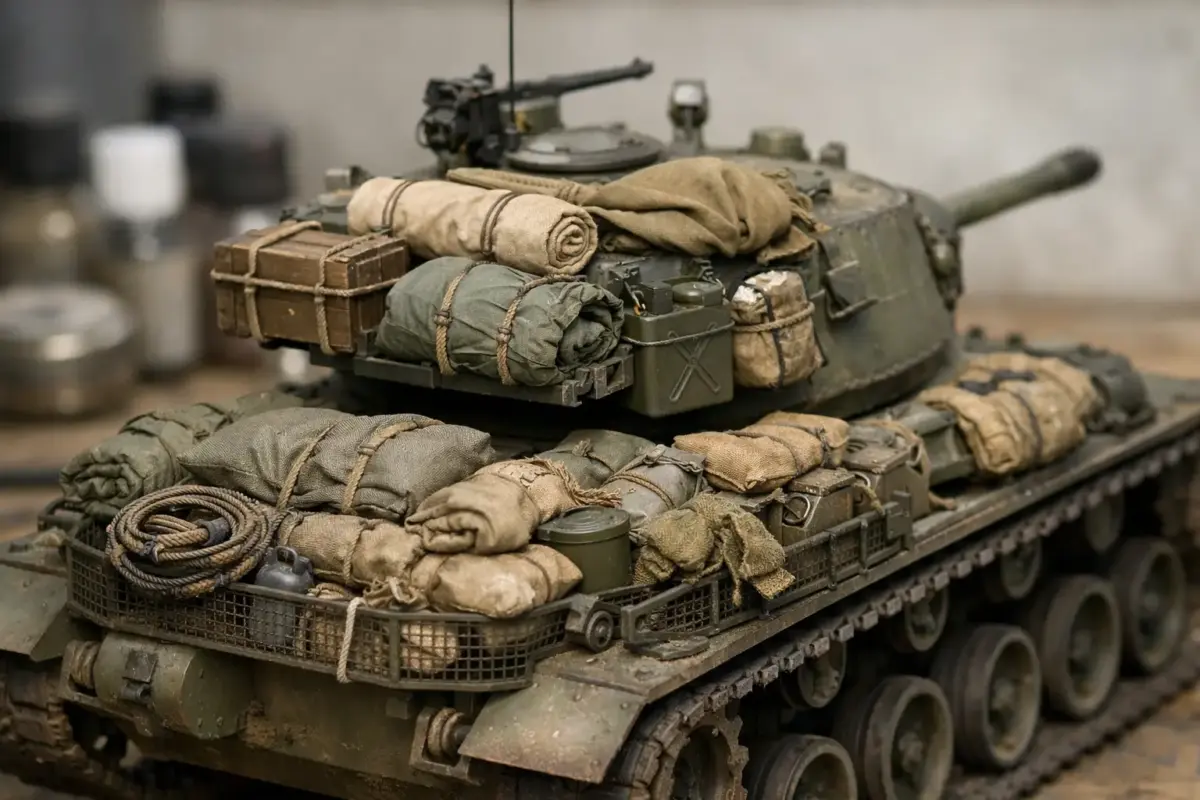
A bare hull can make even an expertly built armour kit look more like a museum piece than a vehicle in service. The right 1/35 tank stowage accessories add the practical clutter that tells the viewer where a vehicle has been, how its crew lived and what job it was doing. The key is not simply adding more kit. It is choosing a believable load, fitting it convincingly and finishing it as part of the vehicle rather than as an afterthought.
Why 1/35 Tank Stowage Accessories Matter
Stowage gives a model a sense of weight, use and human presence. Rolled tarpaulins suggest a crew preparing for a long move; fuel cans and jerry cans imply range concerns; ration boxes, bedrolls and personal packs make the fighting compartment feel occupied. On an open-topped vehicle, that detail is especially visible. On a closed tank, it can break up large flat areas and direct the eye towards the turret bustle, engine deck or hull sides.
There is a trade-off. A heavily laden model can be very effective, but only if it suits the subject. Many wartime photographs show tanks carrying considerable personal and unit equipment, while others are comparatively clear of external loads. Parade vehicles, vehicles photographed immediately after delivery, and armour operating close to supply lines may need far less stowage than a hard-worked vehicle on campaign.
Before selecting parts, decide on a specific moment for the model. Is it a Sherman crossing northern Europe, a British tank operating in the desert, or a modern vehicle paused during a patrol? That decision will guide the amount, type and condition of every item you add.
Match the Stowage to the Vehicle and Theatre
The most convincing arrangement begins with research, even if it is limited to a handful of clear period photographs. Look for how crews used the available space. Turret sides, rear decks, fenders, track guards and rear hull plates were all common attachment points, but the exact layout depended on the vehicle.
A German late-war vehicle may carry camouflage fabric, spare track links, wooden boxes and fuel cans, often tied around the rear hull or turret. A US vehicle might show duffel bags, rolled canvas, ration cartons and jerry cans secured around a turret bustle rack. British and Commonwealth armour has its own recognisable mix of canvas equipment, crew packs, water containers and locally sourced items. The principle applies equally to Cold War and modern subjects, where rucksacks, camouflage nets, water bottles and modular packs may replace the more familiar wartime loads.
The theatre matters as much as nationality. Desert stowage often looks dusty, faded and exposed, with water containers and sun-bleached fabric making sense. A north-west Europe vehicle may carry wetter, muddier tarps and darker fabric, while winter scenes call for blankets, whitewashed equipment or additional crew comfort items. Do not assume every item in a generic accessory set belongs on every build.
Choose a Story, Not a Random Selection
A useful approach is to give the vehicle a short operational story. A tank halted beside a road may have only its standard kit and a few crew belongings. One that has been away from its unit for days might carry extra fuel, food, tarpaulins and salvaged containers. A recovery or maintenance scene can justify tools, spare road wheels and more visible workshop equipment.
This prevents the common temptation to use every attractive item supplied in a resin set. Stowage should explain the vehicle, not obscure it. If a finely detailed engine deck, pioneer tool layout or unit marking disappears beneath a mountain of baggage, reduce the load.
Resin, Plastic, Fabric and Scratch-Built Loads
Aftermarket 1/35 tank stowage accessories are available in several materials, and each has a different role on the workbench. Resin accessories usually offer the sharpest folds, straps and texture, making them a strong choice for packs, crates, bedrolls and cast equipment. Clean resin carefully, remove casting blocks with a fine saw where necessary, and use cyanoacrylate adhesive for a dependable bond.
Injection-moulded plastic accessories are often included in vehicle kits or separate sets. They are easy to work with and accept plastic cement where both surfaces are styrene. Their detail can be excellent, although thin straps and soft canvas folds may benefit from replacement or refinement.
Fabric, lead foil and thin sheet material are particularly useful for tarpaulins, blankets and tie-down straps. A rolled tarp made from putty or soft material can be shaped around the hull rather than sitting on it like a separate object. This is valuable when you need a load tailored to a particular rack or fender.
Scratch-building remains worthwhile for simple items. Wooden crates can be made from styrene strip, straps from foil or masking tape, and ropes from fine thread. It depends on the model and the level of accuracy required, but a few custom pieces often make a commercially available set look far less repetitive.
Planning a Believable Load Layout
Test-fit every piece before painting or gluing. Blu Tack or a small amount of removable putty lets you assess the silhouette from all angles. Check that turret hatches can plausibly open, crew vision blocks remain visible where appropriate, and hull tools are not buried without a reason.
Keep larger objects low and close to the vehicle. Heavy jerry cans, ammunition boxes and crates need a credible support point, such as a fender, rear deck or purpose-built rack. Softer items can sit higher, but they still need to look tied down. A bedroll balanced across the turret roof with no straps will immediately look unconvincing.
Think about grouping. Two or three related items, such as a tarp, crate and fuel can, look more natural than evenly spaced objects placed around the hull. Leave some areas open. Empty space makes the loaded areas feel deliberate and retains the recognisable shape of the tank.
When planning, check these practical points:
- Keep critical features visible, including hatches, periscopes, tow cables and markings.
- Place heavy equipment on a surface that could realistically support it.
- Use straps, rope or wire to show how each loose item is secured.
- Avoid identical packs or rolls placed at matching angles.
- Compare the final silhouette with reference photographs before committing to glue.
Securing Stowage Properly
Attachment is where a good collection of accessories becomes part of the model. Real crews used webbing, rope, straps, wire and improvised fastening methods. Reproducing at least some of these is far more effective than relying on the glue joint alone.
Thin lead foil is excellent for straps because it bends naturally and retains its shape. Narrow strips of masking tape also work, particularly when painted and weathered. Fine copper wire can represent retaining wire, while twisted thread or aftermarket cord creates convincing rope at 1/35 scale. Add a little sag between tie-down points, but not so much that the load appears loose.
For resin items, establish solid contact points first, then add straps after the main adhesive has cured. If a pack sits against a vertical surface, a discreet pin made from wire can provide extra strength. This matters on turret sides and bustle racks, where a resin load has little natural support.
Painting Stowage So It Belongs on the Tank
Paint accessories separately when possible. It is easier to reach the underside of a tarp, the gaps between boxes and the sides of a pack before it is fixed to the vehicle. Prime resin parts first, then build colour in restrained layers. Canvas is rarely one flat shade: vary the base colour subtly between rolls, packs and covers, then use thin lighter tones on raised folds.
Wooden crates benefit from directional grain effects and slightly different plank tones. Metal fuel cans can be painted in service colours, then chipped sparingly around handles, corners and seams. Personal equipment should not all be the same green or khaki. Small variation brings scale interest without becoming overly colourful.
Weathering needs to connect the stowage to the vehicle. If the tank has dusty running gear and a dry, pale finish, carry a similar dust tone onto the lower edges of bags, crates and tarps. A muddy vehicle needs mud where the crew would have handled or splashed the load, rather than a uniform coat over every object. Pigments, enamel effects and carefully applied acrylic washes all work, provided the finish matches the scene.
Be restrained with chipping on fabric. Canvas wears through, stains and fades, but it does not chip like painted steel. Likewise, a cardboard ration carton may be scuffed and dirty, yet should not receive heavy metallic scratches. Material-specific weathering is one of the details that separates a convincing load from a collection of painted accessories.
Build the Project Around the Details
Stowage is easiest to integrate when it is planned alongside paints, weathering products, figures and groundwork rather than bought at the end of the build. A crew figure can help establish scale and show why a blanket or pack is placed where it is. Groundwork can influence the dust and mud shades applied to the load. Decals and markings may determine which turret areas should remain clear.
Scale Model Shop stocks the kind of project-focused range that makes this approach practical, from 1/35 accessory sets and detailing materials to paints, adhesives, weathering products and diorama supplies. Selecting compatible items together also helps maintain a consistent finish across the vehicle and its surroundings.
The best stowage arrangement is usually the one that makes a viewer pause and imagine the crew just out of frame. Add only what the vehicle needs, secure it with purpose, and let a few well-chosen details do the storytelling.
